Sigma Online User Manual
Creating Tenants
- Kim Blake
- Graham Paul
When you have a new Site, you will need to create the Site and any Accounts, Meters, Sub Meters, Virtual Meters, Channels and Supply Points.
Click here for more information on Creating Associated Items.
This section shows how to create a Tenant, Tenant Account and the associated Contracts, Tariff, Cost Definitions etc.
Creating a Tenant and Tenant Account
Creating a Tenant
A Tenant will need to be created if they do not already exist in Sigma
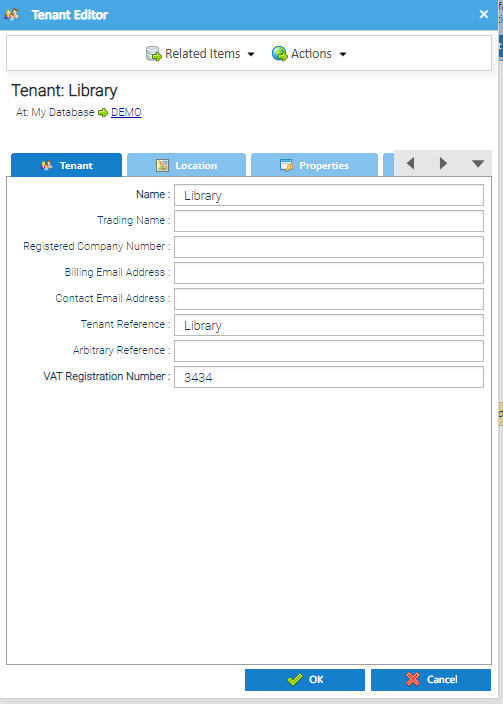
The Tenant screen holds details of the Tenants name and VAT Registration Number along with a Location tab to enter a billing address.
- Right click on the Organisation
- Click Add
- Click Tenant
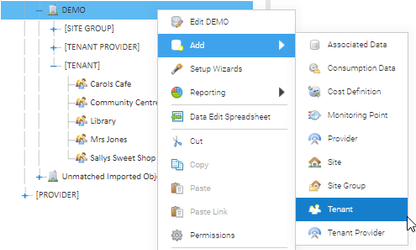
Alternatively expand the Tree Selector
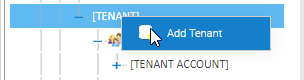
- Right click on TENANT
- Click on Add Tenant
The Tenant Editor opens
- Configure the Tenant details as follows:
| Field | Description |
|---|---|
| Name | Name of the Tenant |
| Trading Name | (optional) - Trading name of the Tenant |
| Registered Company Number | (optional) - Registered Company number of the Tenant |
| Billing Email Address | (optional) - Billing mail address of the Tenant |
| Contact Email Address | (optional) - Contact email address of the Tenant |
| Tenant Reference | Enter the name you want to appear on the bill |
| Arbitrary Reference | (optional) -This can be used to record information about the Tenant Provider that is relevant to your business |
| VAT Registration Number | VAT registration number of the Tenant. This will typically appear on Tenant invoices where they are created |
| Location Tab | Enter address details for the Tenant. This will typically appear on Tenant invoices where they are created |
- Click on the Location Tab
- Add details in the Contact Address fields if you want the billing address to appear on the bill
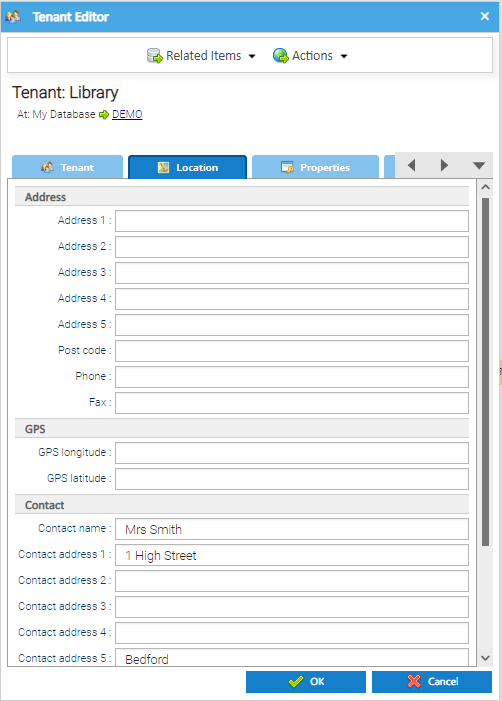
- Click OK to save
The Tenant details are saved and the Tenant Editor closes
Creating a Tenant Account
A Tenant Account need to be created for each Supply Point that represents the supply of a Commodity to the Tenant.
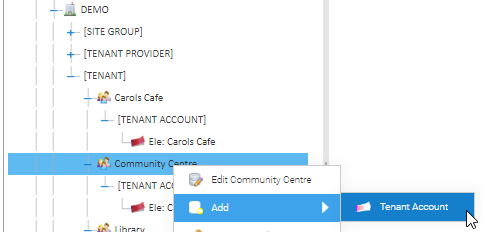
The Tenant Account is added under a Tenant:
- Right click on the Tenant
- Click Add
- Click Tenant Account
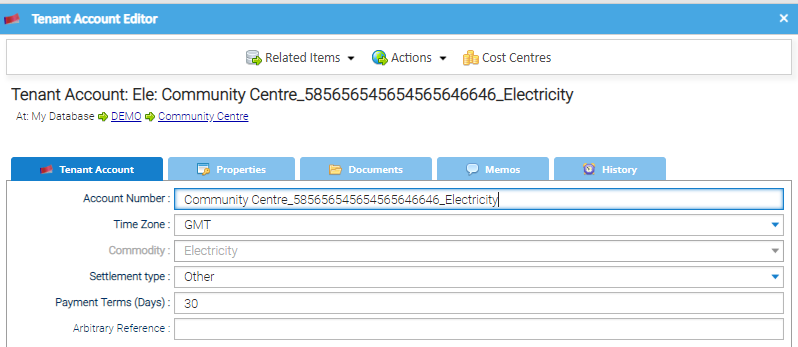
The Tenant Account Editor opens
Configure the Tenant Account details as follows:
| Field | Description |
|---|---|
| Account Number | Enter the Account Number of the Tenant Account. Note: As there is a one-to-one relationship between a Tenant Account and a Supply Point, it is good practice is to enter the Supply Point Name and Commodity for consistency. Example: Community Centre_585656545654565646646_Electricity |
| Time Zone | Select a value from the dropdown list. Consumption data (stored in GMT) will be converted to this time zone in Tenant Billing. |
| Commodity | Choose from the dropdown list, for example, Gas, Electricity, Water |
| Settlement type | Choose from the dropdown list (Other, Cheque, Direct Debit). |
| Payment Terms (Days) | Enter a value between 0 and 400 (the amount of days before the invoice is overdue) |
| Arbitrary Reference | (optional) - this can be used to record information about the Tenant Account that is relevant to your business. |
| Charge name | If required add/view/edit/delete Adhoc charges |
- Click OK
The Tenant Account details are saved and the Tenant Account Editor closes.
- Click OK to save the Tenant Account
Creating a Contract, Cost Definition and Tariff
Creating a Tenant Contract
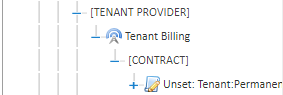
The Tenant Contract is under the Tenant Provider in the Tree Selector. A Tenant Provider represents the Organisation / Site Manager that is billing the Tenants and holds the Contracts and Tariffs for Tenant Billing.
If this doesn't already exist, set up new Provider using this page: Adding / Maintaining a Tenant Provider.
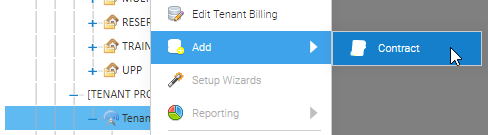
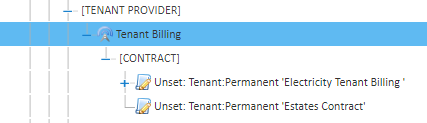
To check if a Tenant Contract already exists:
- Click on the Tenant Provider in the Tree Selector
- Click CONTRACT
- Right click on the Contract to view the details
If not, create as follows:
- Right click on the Tenant Provider in the Tree Selector
The Contract Edit pop up opens
- Complete the popup as follows:
| Field | Description |
|---|---|
| Displayed Name | This field is automatically generated |
| Title | Name of the Contract |
| Commodity | Choose the Commodity |
| Service Type | Choose Tenant |
| Quality | Defaults to Normal |
| Tariff | Defaults to No Tariff |
| From date | Choose the from date |
| To date | Choose the to date |
| Permanent tick box | Tick to override the From and To dates |
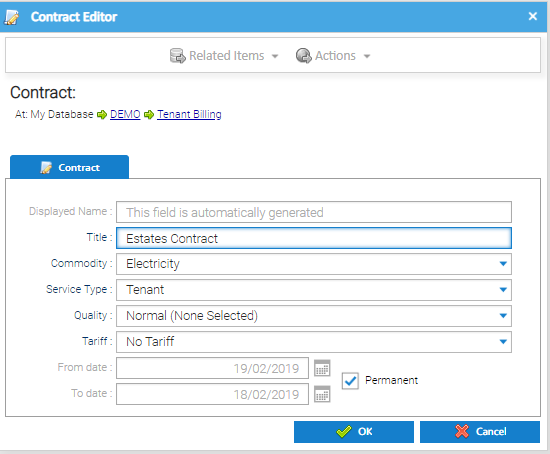
- Click OK to save and create the Tenant Contract
The Contract is now visible under the Tenant Provider
Creating a Cost Definition (if it doesn't exist already)
Click here for more details on how to create a Cost Definition
Creating a Tariff (if it doesn't exist already)
Click here for more details on how to create a Tariff
Creating a Tenant Supply Point
The Tenant Supply Point brings the Items together to enable billing, such as the Tenant, Meter, Account and Contract.
The Tenant Supply Point is created under the Site. There is a separate Supply Point for each commodity.
- Right click on the Site
- Click Add
- Click Supply Point
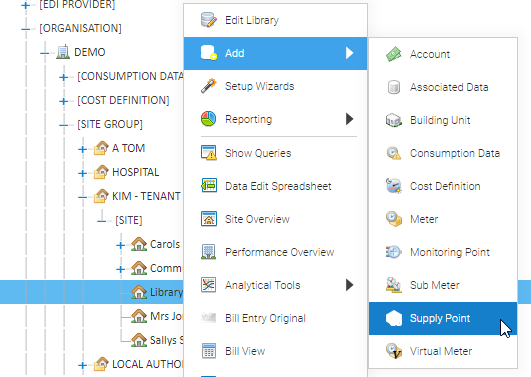
The New Supply Point Commodity popup opens
Select the Commodity
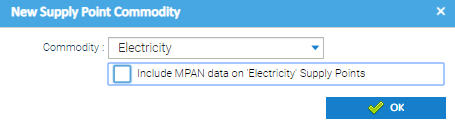
Note: For Electricity - untick Include MPAN data on Electricity Supply Points ans a 'full MPAN' is not required
- Click OK
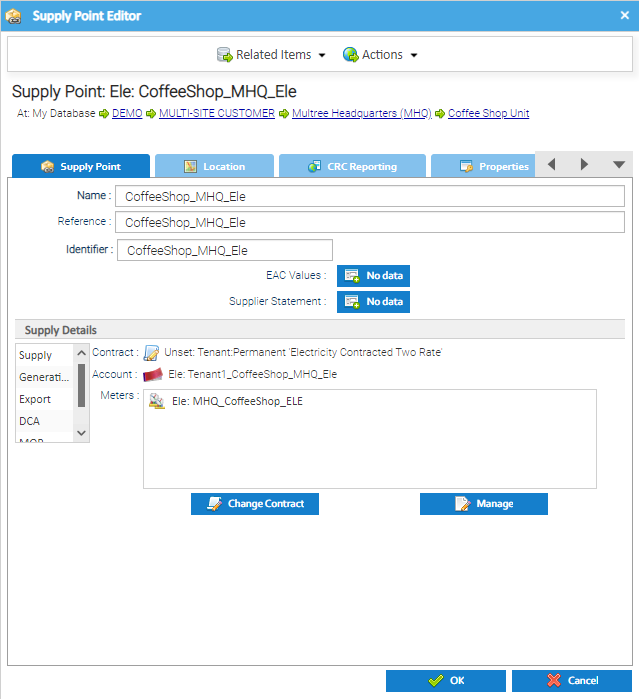
- Enter the Supply Point Name, for example CoffeeShop_MHQ_Ele
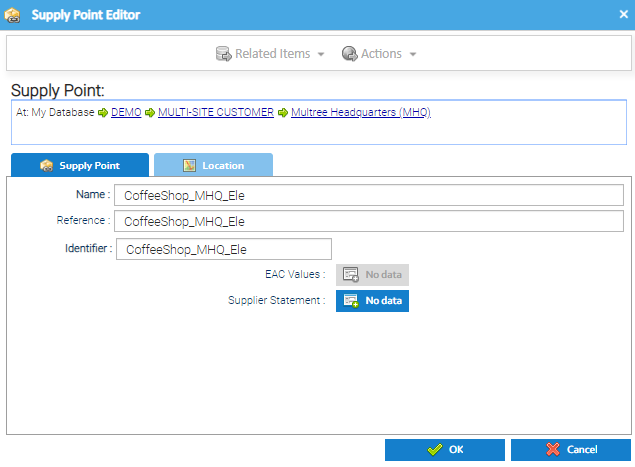
- Copy and paste the Name into both the Reference and Identifier fields
Note: When using more than one word, separate with an underscore otherwise the spaces are stropped out when imported using a tag.csv file.
- Click OK to create the Tenant Supply Point
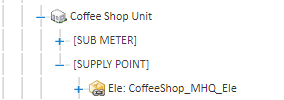
The Tenant Supply Point is now visible in the Tree Selector, but will show in red as no Items have been associated with it.
Associating a Tenant Supply Point with Tenant, Meter, Account and Contract
The Items associated with the Supply Point will be used to bill the Tenant.
Viewing the Tenant Supply Point
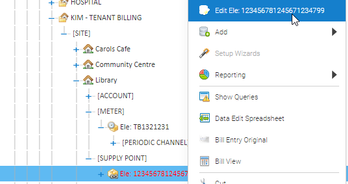
- Right click on the Tenant Supply Point from the Tree Selector
- Click Edit
The Supply Point Editor popup opens.
Changing the Supply Point to Tenant
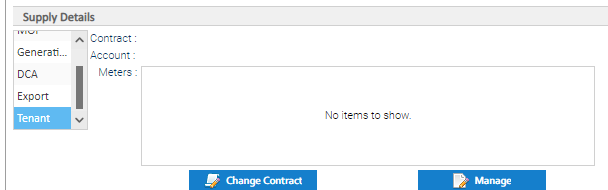
- Click Tenant in the Supply Details
Adding the Contract Dates
- Click

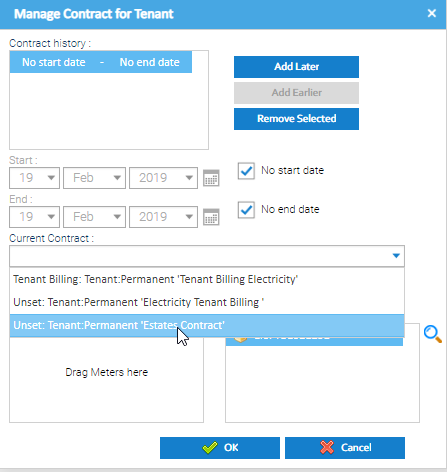
The Manage Contract for Tenant popup opens.
- Click
 to start the Contract
Sigma will default to show a start date of today and tick No end date.
If you do not need a start or end date, tick No start date
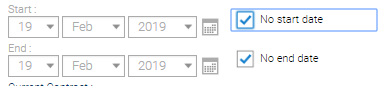
Alternatively, tick or untick the start and end dates as required and amend the dates as required
Linking the Contract
- Click on the dropdown and select the relevant Contract
Linking the Tenant Account
- Click on the magnifying glass to add the Tenant Account

The Tenant Account Selector popup opens:
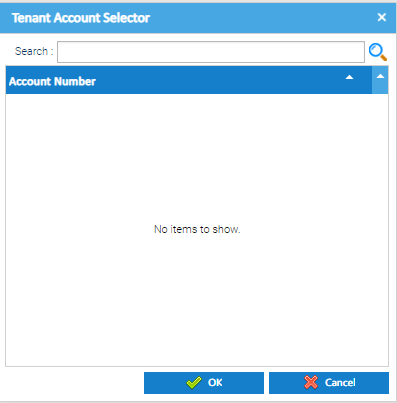
- Click on the magnifying glass to view all Accounts
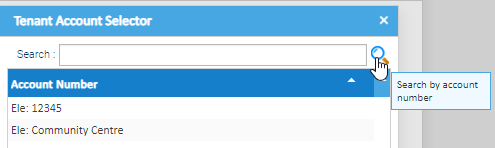
- Highlight the Account
- Click OK to return to the Manage Contract for Tenant popup

Linking the Meter
- Drag and drop the Meter from the Available Meters to the Selected Meters section.
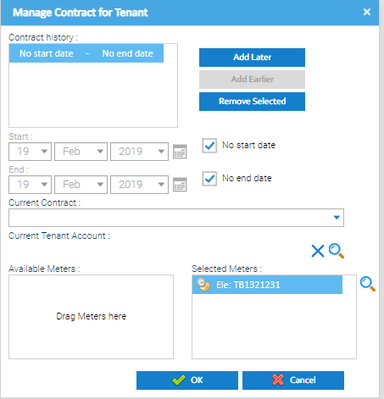
- Click OK to return to the Supply Point Editor popup where you can see the associated Items have been added
- Click OK to close the Supply Point Editor
Adding a Tenant Account to a Billing Group
Now the Supply Point has been set up along with the Tenant, Tenant Account etc, this needs to be added to a Billing Group to enable bills to be produced. The Tenant Account will be defined as Unassigned until it is attached to a Billing Group
The Tenant Billing Groups are shown in the Tenant bill Run Initiation Activity.
To add your new Tenant Account to a Billing Group:
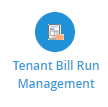
- Click on the Tenant Bill Run Initiation
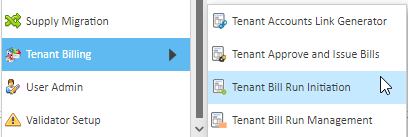
or select the Tenant Billing from the Sigma Activities dropdown list
- Select the Tenant Bill Run Initiation sub-menu item:
The Tenant Bill Run Initiation screen opens as shown below:
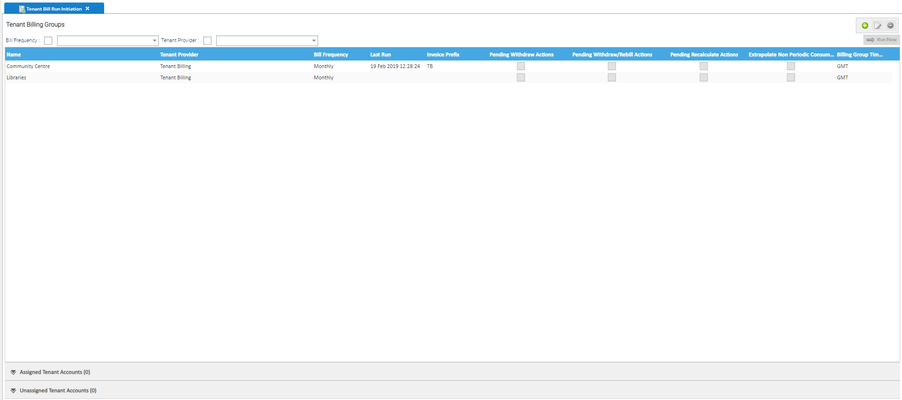
- Select the Tenant Billing Group in the Tenant Billing Groups section

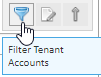
- Click on

- Select the required Filter options
- Click Apply Filter to search and select the required Unassigned Tenant Account(s)

- Highlight the Account
- Click Assign at the top of the section

Alternatively right click on the Tenant Account
- Click Assign
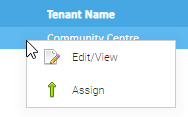
The selected Tenant Account is assigned to the Tenant Billing Group highlighted at the top of the screen
The screen is updated so that the selected Tenant Account is no longer displayed in the Unassigned Tenant Accounts section.
Related content
@ Copyright TEAM - Energy Auditing Agency Limited Registered Number 1916768 Website: www.teamenergy.com Telephone: +44 (0)1908 690018