Sigma Online User Manual
Sigma Importing Agent
- Tom Anderton
- Kim Blake
- Laura Blowing
Introduction
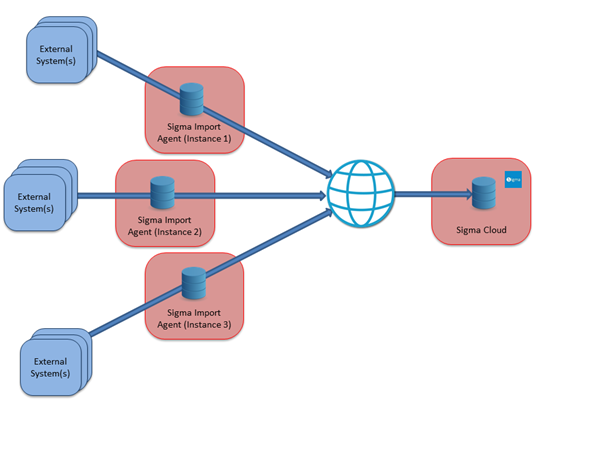
Sigma has hundreds of pre-built integrations to data sources providing enterprise-grade security to protect your data. It can provide both off the shelf and develop custom interfaces in line with your organisation’s needs, to enable data transfer to and from data sources. The Sigma Import Agent (SIA) is just one of a number of options that can be provided for importing data.
The SIA is an intelligent solution designed to transfer energy data from your on-site system into Sigma. Flexible and easy to set-up, it provides robust and reliable data transfer from a wide variety of sources.
The SIA scheduling function automates data transfer at the intervals specified by you. Data is transferred into Sigma via the Sigma application programming interface (API) and stored locally on the SIA until successfully loaded into the system to provide fault tolerance. Incidents where data transfer may be interrupted are managed by the SIA, which automatically re-sends the data when the connection is restored. Information passes through security via the internet and Sigma firewalls before being loaded and processed by Sigma.
Overview
Setting up Sigma to import HF data from one or multiple external systems using the SIA involves some of the following activities:
- Configuring Import Agents within Sigma to represent each SIA instance.
- Installing the SIA at each Site and capturing the appropriate Import Agent during the Installation process.
- Configuring schedules within Sigma to import HF data from external systems and linking them to the appropriate Import Agent.
- Configuring channels within Sigma to receive HF data.
Current Supported External Systems
- BMS Systems
- SIPe
- Trend - 963 MSSQL
- TAC Continuum (Schneider Electric)
- Siemens Desigo
- Landis and Gyr
- Communication Protocols:
- Modbus
- Obix
How Does the Sigma Import Agent Work?
On startup, the SIA creates a local database, if one does not already exist. It then contacts the Sigma Cloud to get a list of scheduled imports to be run, using the Import Agent that was captured during installation to identify the relevant scheduled imports. This list is recorded in the local database and is refreshed at regular intervals. The local database also holds information on Sigma Channels for which HF data will be imported.
Once running, the SIA triggers each scheduled import as it becomes due. It reads the HF data from the external data collection systems /devices and records the HF data in the local database.
At regular intervals, the SIA transfers the HF data from the local database to the Sigma Cloud. Once successfully loaded into the Sigma Cloud, the HF data is cleared from the local database.
The SIA provides a log file which confirms the scheduled imports that have been run and the Sigma Channels for which HF data has been imported.
Configuring Import Agents
This section describes how to configure Import Agents within Sigma to represent each SIA instance
View Import Agents
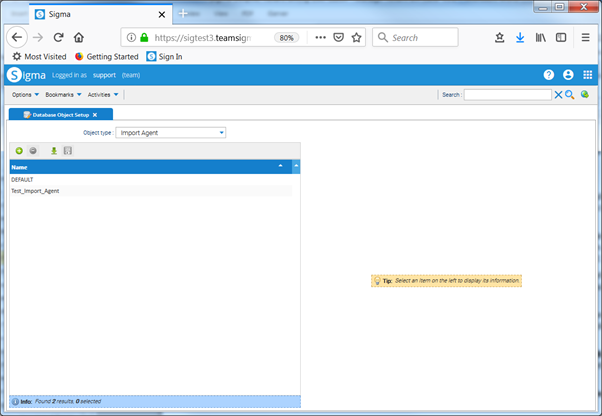
To view all Import Agents:
- Open the Database Object Setup Activity in the Sigma Browser and select the Import Agent Object type from the dropdown list.
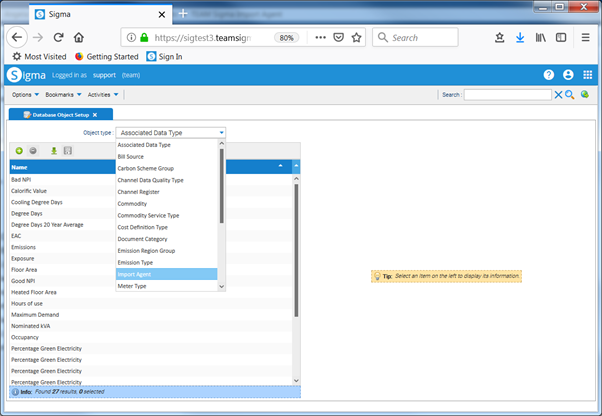
- The configured Import Agents are displayed in the left-hand pane.

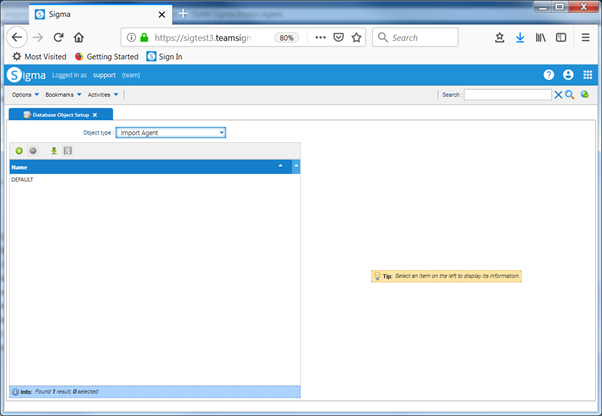
- Your Company database is pre-configured with an Import Agent called ‘DEFAULT’.
- Use this Import Agent if the SIA is being installed on a single Site.
- If the SIA is being installed on multiple Sites, then configure an Import Agent to represent each installed SIA instance, as described in the next section.
Add an Import Agent
To configure a new Import Agent:
- In the Database Object Setup activity click on the Add icon at the top of the left hand pane.
- The Import Agent Editor pop-up opens.
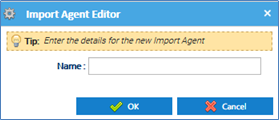
- Enter the Name of the Import Agent. The Import Agent Name entered here must NOT contain spaces.
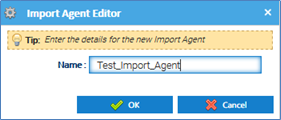
- Click on OK to save the Import Agent. The Import Agent Editor pop-up closes and the left hand pane is updated to display the newly configured Import Agent.
- Alternatively, click on Cancel to close the Import Agent Editor pop-up and re-display the left hand pane unchanged.
View/Edit an existing Import Agent
- Select the Import Agent in the left hand pane. The Name of the Import Agent is displayed in the right hand pane.

- Change the Name of the Import Agent as required.
- Click on Save to save the change made to the Import Agent.
- Alternatively, click on Reset to abandon the change and restore the Import Agent to the latest saved details.
Remove an Import Agent
To remove an existing Import Agent:
- Select the Import Agent in the left hand pane.
- Click on the Remove icon at the top of the left hand pane.

- The Delete Item pop-up opens:

- Click on OK to confirm the removal of the Import Agent. The Delete Item pop-up closes and the Import Agent is removed from the left hand pane.
- Alternatively, click on Cancel to abandon the removal, close the Delete Item pop-up and re-display the left hand pane unchanged.
Installing and Running the Sigma Import Agent
This section describes how to install and run the SIA at each Site - this covers both new installations and updating an existing installation.
SIA Release Mechanism
Periodically new versions of the SIA software will be issued containing enhancements or bug fixes. These will typically be issued alongside an upgrade to the Sigma Cloud and you will be notified where its is recommended that you upgrade to the latest version.
New SIA packages are designed to be backwards compatible, so will usually continue to work even though newer versions have been issued.
Pre-requisites
If this is the first time you are installing the SIA then you must first contact TEAM Support for your SIA password. You will need this when running the SIA Installer.
If you have previously installed the SIA and the related Sigma Import Agent Windows service is running, the SIA service needs to be stopped from the Task Manager:
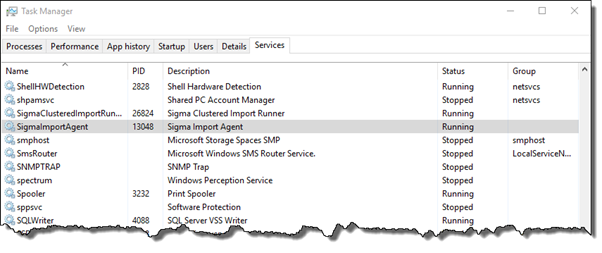
Please note you will need Administrator rights to stop and start the SIA service successfully.
Run the SIA Installer
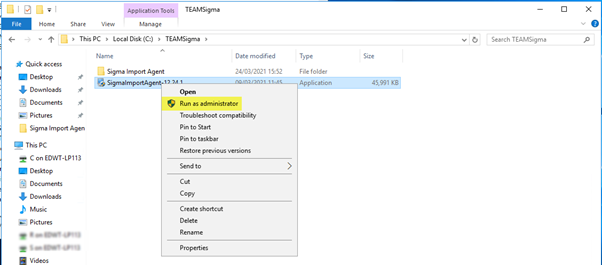
- Navigate to the file location on your PC where the SIA Installer file has been saved and right click on the application file and select “Run as Administrator” to run the SIA Installer.
Specify Java Installation Version
A pop-up asks you for the filepath of the relevant Java installation version
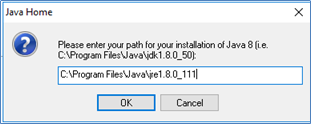
- Enter the requested details and then click on OK.
- Note you can find the path by navigating to C:\Program Files\Java and the directory that appears in there. This will look something like the above screenshot, it is likely the last 3 digits may be different depending on the version number installed.
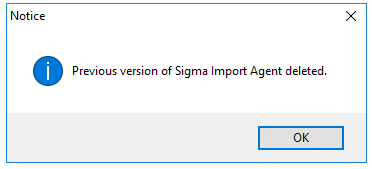
- If you are upgrading an existing version of the SIA, then the existing "Sigma Import Agent" windows service will be removed as it will be replaced by the new version. You will likely see a message pop up like the following. You will not see this message if this is the first installation of the SIA.
- The next pop-up allows you to close any Windows programs that are running before starting the SIA Installer.
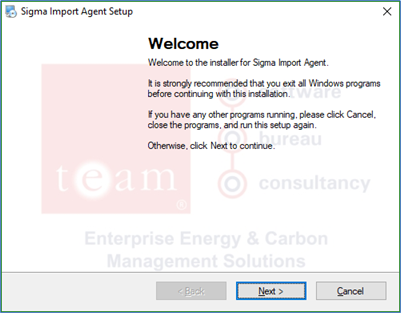
- Click on Next to continue.
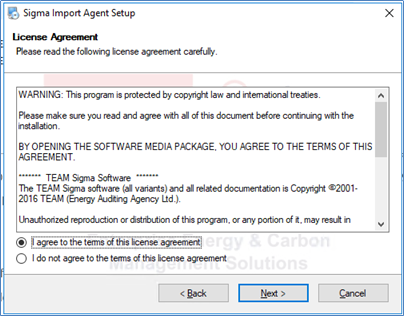
Review License Agreement Terms
- The next pop-up provides details of the License Agreement.
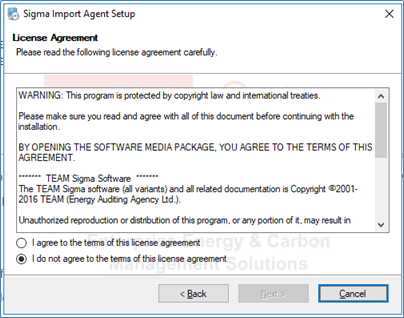
- Once you have reviewed the details, click on Cancel if you want to stop the installation, otherwise click on the ‘I agree …’ option and then click on Next to continue.
Define the Installation Folder
- The next pop-up asks you for the filepath of the installed SIA. If you are upgrading an existing installation of the SIA, this should reflect the current installation directory. Note C:\TeamSigma is the default.
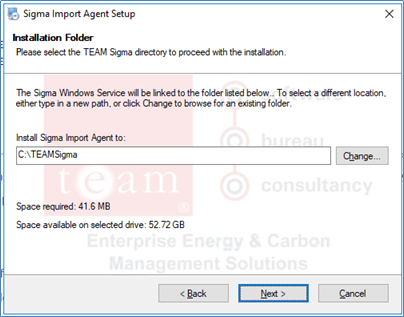
- Enter the requested details and then click on Next to continue. A folder named Sigma Import Agent will be created under this location.
Enter Credentials for Running the SIA
- The next pop-up allows you to enter the credentials for running the SIA.
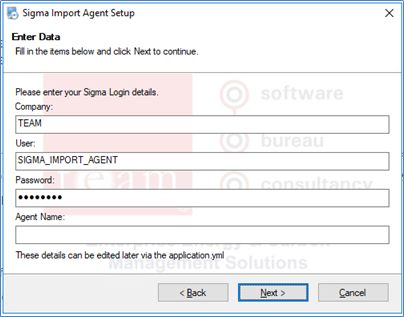
- If you are upgrading an existing Sigma Import Agent:
- These details will need to be copied from the existing “application.yml” file that exists in the current SIA installation directory (by default this well be C:\TEAMSigma\Sigma Import Agent)
- Open this file in a Notepad Editor and copy the relevant company, user, password and agentname details into the fields on the installation screen.
- If this is the first time installing the Sigma Importing Agent:
- Enter the Company database name in the Company
- Enter “SIGMA_IMPORT_AGENT” in the User
- Enter the SIA password provided by TEAM Support in the Password field
- Enter the Name of the Import Agent that represents the SIA instance.
- You can leave this field blank, in which case the installation will automatically specify ‘DEFAULT’ and, when the SIA starts, it will begin looking for and running import schedules for the ‘DEFAULT’ Import Agent.
- If you enter the Name of an Import Agent that has not yet been configured in Sigma then, when the SIA starts, it will begin looking for, but will not find any import schedules for the specified Import Agent. The SIA will continue looking until the Import Agent has been set up in Sigma and assigned to one or more import schedules. These schedules would then only be picked up at the next SIA refresh.
- Click on Next to continue.
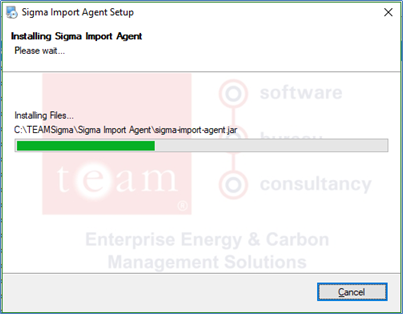
Complete the SIA Installation
- The next pop-up screen confirms that the installation can proceed.
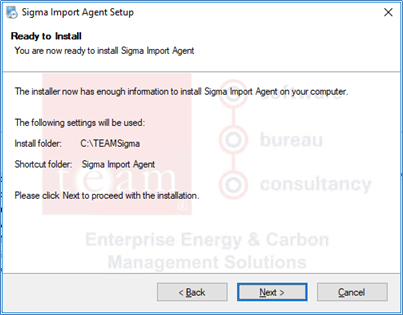
- Click on Next to continue. The installation should take less than a minute to complete.
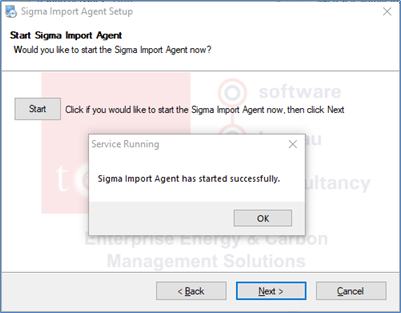
Start the Sigma Import Agent Service
- When the files have been installed, the next pop-up allows you to (optionally) start the SIA service.
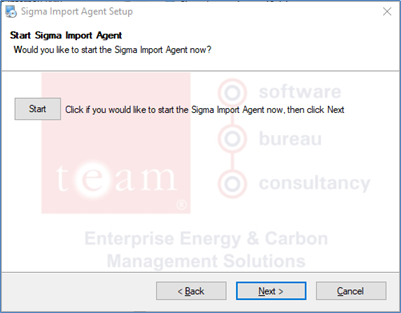
- Click on Start to start the SIA service immediately, or you can start it later from the Task Manager.
- If you experience any error messages starting it from here, you will need to Stop/Start the service via the Task Manager.
- Click on Next to complete the installation. If you clicked on Start, you should see a message telling you that the SIA started successfully.
Complete and Check the Installation
- The next pop-up confirms that the SIA installation has completed successfully.
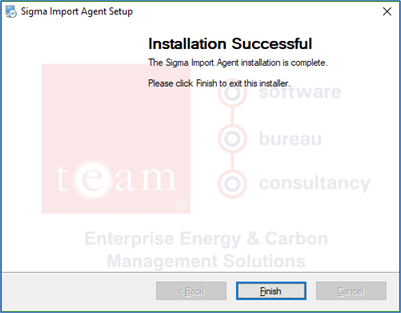
- Click on Finish to exit the SIA Installer.
- Open the Task Manager to confirm that the ‘Sigma Import Agent’ service is now running.

View Log files
Following the successful installation, log files will be seen under the ‘Sigma Import Agent’ folder in the location folder.
The log file will provide details of the application initialisation/startup, which includes initialising the local database, setting up initial static data, reading/updating schedule details and authorising access to the Sigma Cloud.
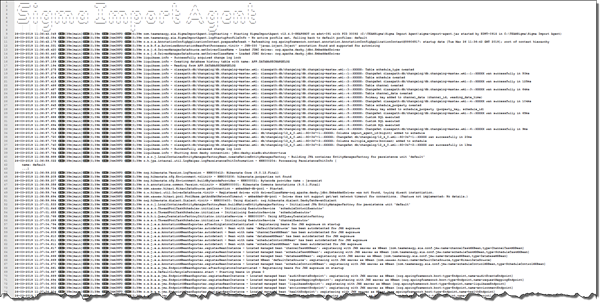
Once the SIA is running, the log file will provide details of scheduled imports that are triggered.

For each scheduled import that is triggered, the log file will identify the number of channels found to be processed (from the source database, from the local database or from the Sigma Cloud) and the status of the channel data import.
Any exceptions that occur are logged as “ERROR” messages, for example:

Configuring Scheduled Imports
To start the configuration:
- Open the Importing Activity in the Sigma Browser. You will be asked whether you want to run the import now or schedule the import.
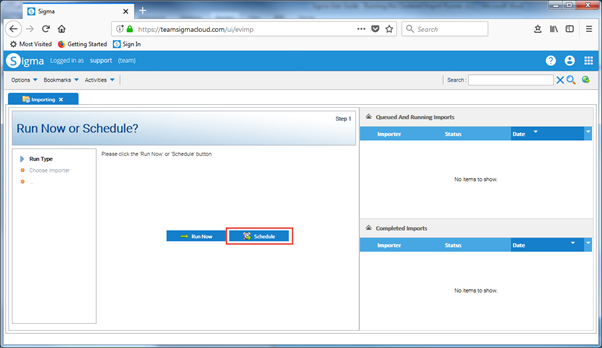
- Select the ‘Schedule’ Please note that you can only schedule imports that use the SIA. You cannot select the 'Run now' option. If you need to run a SIA based import ‘now’ simply schedule it to start immediately.
Choose an Importer
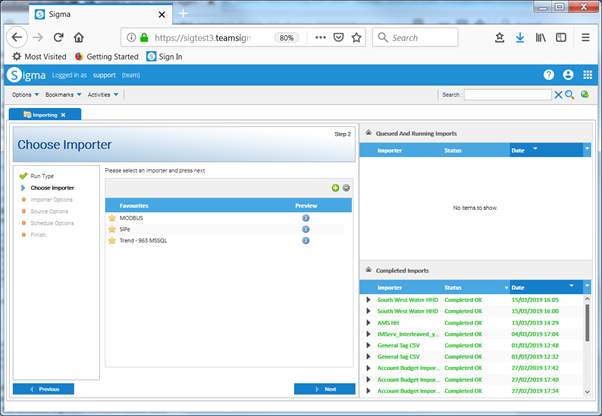
- Select the importer that is compatible with your data collection system / device. If it does not appear in the list of Favourites, you can add it by selecting the ‘Add’ icon.
- Select ‘Next’ to continue to the next step or ‘Previous’ to go back to the previous step.
- For Scheduled Imports using the ‘SIPe’ importer or the ‘Trend – 963 MSSQL’ importer, the next step is to enter Importer Options.
- For Scheduled Imports using the ‘MODBUS’ importer, the next step is to enter Schedule Options.
Enter Importer Options
This step applies to:
- Scheduled Imports using the ‘SIPe’ importer.
- Scheduled Imports using the ‘Trend – 963 MSSQL’ importer.
- Scheduled Imports using the ‘SIA Continuum Non-Periodic’ / ‘SIA Continuum Periodic’ (TAC) importer.
- Scheduled Imports using the ‘SIA Landis and Gyr’ importer.
Enter Importer Options for SIPe

- Enter the Host name / Database name details and Username / Password credentials that the SIA will use to connect to and access your SIPe / MYSQL database.
- Amend the other importer options as necessary, such as the date range, i.e. Start Date and End Date, of data to load.
- If you select the ‘Use date range’ option and you also select the ‘Adjust dates relative to date of execution’ option in the Schedule Options screen (see next section) then the Start Date controls the number of days back that data is imported, the date range is dynamically adjusted every time the scheduled import runs.
- The 'Store any zeros as null within the meter reading channels' option can be used to control how zero values in the import data are stored in Sigma:
- For an HFD channel set up for 'Meter readings':
- If the tick box is selected, a zero value in the import data is stored in Sigma as value = 0, status = NULL
- if the tick box is not selected, a zero value in the import data is stored in Sigma as value = 0, status = No Error
- For an HFD channel set up for 'Consumption':
- A zero value in the import data is always stored in Sigma as value = 0, status = No Error (regardless of whether the tick box is selected).
- Select ‘Next’ to continue to the next step to enter Schedule Options or ‘Previous’ to go back to the previous step.
Enter Importer Options for Trend963
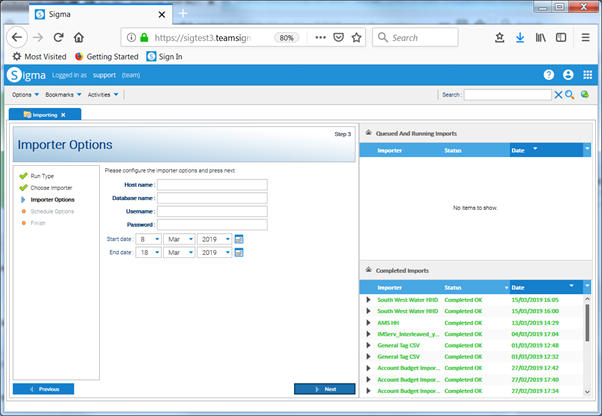
- Enter the Host name / Database name details and Username / Password credentials that the SIA will use to connect to and access your Trend963 / MSSQL database.
- Amend the other importer options as necessary, such as the date range, i.e. Start Date and End Date, of data to load.
- Select ‘Next’ to continue to the next step to enter Schedule Options (section 4.5) or ‘Previous’ to go back to the previous step.
Enter Importer Options for TAC (Continuum)
Enter Importer Options Landis and Gyr
Enter Schedule Options
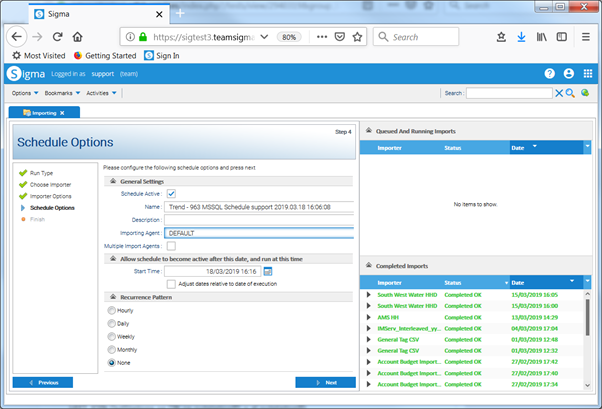
- Amend the Name of the schedule (if required). Please Note that on entry to this screen, the Name of the schedule is pre-populated with:
- The name of the importer, e.g. “Trend – 963 MSSQL”;
- The text “ Schedule ”;
- The user name, e.g. “support”, followed by a space;
- The current date time in <yyyy.MM.dd HH:mm:ss> format.
- Enter a Description (mandatory).
- If only the ’DEFAULT’ Import Agent is configured, untick the Multiple Import Agents
- If multiple Import Agents are configured, tick the Multiple Import Agents checkbox and select the required Import Agent from the dropdown list.
- Enter the date and time you want the Schedule to start. Ideally the time should be out of normal working hours so that is ready for you when you come into work, rather than when you are trying to analyse and look at the data.
- Select the Adjust dates relative to date of execution option if you want the date range to be dynamically adjusted every time the scheduled import runs.
- Choose the Recurrence Pattern, i.e. how often and when you want the Schedule to run.
- When all schedule options have been set as needed, ensure the Schedule Active checkbox is ticked.
- Select ‘Next’ to continue to the next step or ‘Previous’ to go back to the previous step.
Complete Configuration
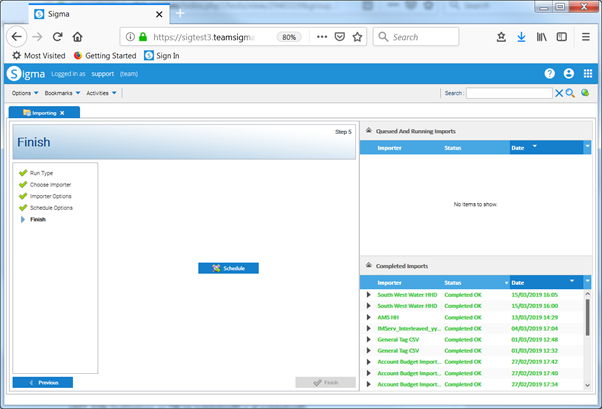
- Click on Schedule to complete the configuration. Once the Schedule has been set up, you can view it and modify the importer options and schedule options in the Schedule Management Activity
Configuring Channels
Configure SIPe Channels
The ‘SIPe’ importer uses information in your SIPe database to build a list of data points that are available for upload into Sigma as follows:
- It finds all tables which have a table name that is in the format “device_<value>” (not case-sensitive).
- It then uses the ‘Host name’ entered as an Importer Option when setting up the scheduled import and appends to this the table name obtained from the previous step to build a Data Load ID.
| Data Load ID | Table Name | Host Name |
|---|---|---|
| team.co.uk_Device_1 | Device_1 | team.co.uk |
| team.co.uk_Device_2 | Device_2 | team.co.uk |
| team.co.uk_Device_3 | Device_3 | team.co.uk |
| team.co.uk_Device_4 | Device_4 | team.co.uk |
| team.co.uk_Device_5 | Device_5 | team.co.uk |
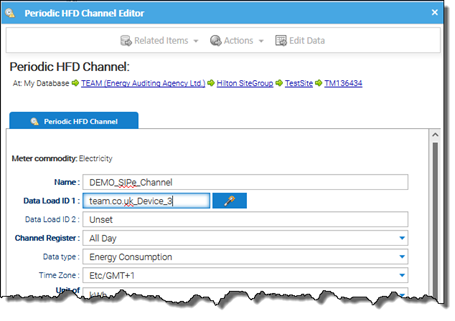
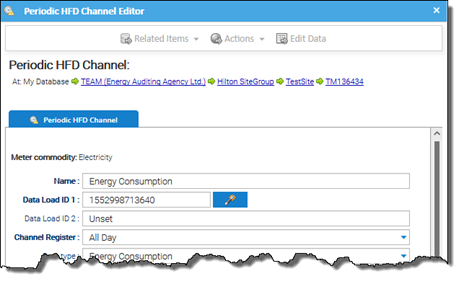
For each SIPe data point that you wish to import HF data from, you will need to configure a Periodic HFD Channel within Sigma with the corresponding Data Load ID. To do this:
- In the Periodic HFD Channel Editor, enter the Data Load ID value in the Data Load ID 1 field, for example:
Configure Trend963 Channels
The ‘Trend – 963 MSSQL’ importer uses the following information in your Trend963 database to build a list of data points that are available for upload into Sigma:
| Database Column | Database Table | Description |
|---|---|---|
| SiteId | SiteDetails | The Unique ID of the Site |
| SiteLabel | SiteDetails | The text label given to the Site |
| LanNo | Lans | The LAN Number (each Site can have multiple LANs) |
| NodeAddress | OutStations | The Outstation Node Address (each LAN can have multiple outstations, ie controllers) |
| Item | StrategyList | The Unique ID of each device connected to a given outstation |
This information is used to derive a Sigma Data Load IDs for each data point as follows:
"S" + <SiteID> + <SiteLabel> + "L" + <LanNo> + "O" + <NodeAddress> + <Item>
For example:
| Data Load ID | Site ID | Site Label | Lan No | Node Address | Item |
|---|---|---|---|---|---|
| S1TeamL11O11D1 | 1 | Team | 11 | 11D | 1 |
| S1TeamL11O11D2 | 1 | Team | 11 | 11D | 2 |
| S1TeamL11O11D3 | 1 | Team | 11 | 11D | 3 |
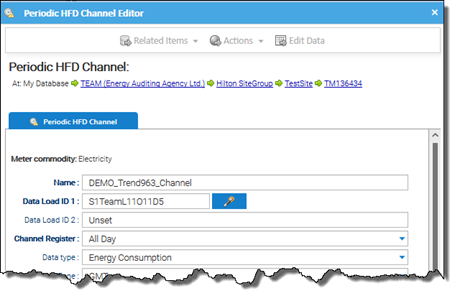
For each Trend963 data point that you wish to import HF data from, you will need to configure a Periodic HFD Channel within Sigma with the corresponding Data Load ID. To do this:
- In the Periodic HFD Channel Editor, enter the Data Load ID value in the Data Load ID 1 field, for example:
Configure MODBUS Channels
For each MODBUS device that you wish to import HF data from, you will need to configure a Periodic HFD Channel within Sigma with a Data Load ID that contains details on how to connect to the MODBUS device. To do this:
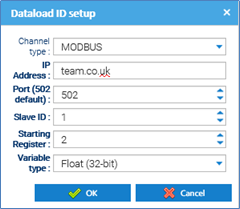
- In the Periodic HFD Channel Editor, click on the Wizard icon next to the Data Load ID1 field.
- Dataload ID setup pop-up opens.
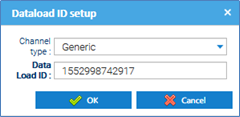
- Select the value ‘MODBUS’ from the Channel type dropdown list.
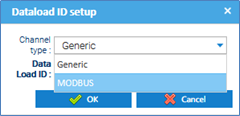
- Additional fields are displayed to assist you with generating the Data Load ID.
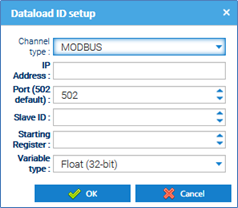
- Enter the IP Address of the local machine where the SIA is installed.
- Ensure Port is set to 502 (default).
- Enter the Slave ID and Starting Register of the MODBUS device.
- Select either ’32-bit Float’ or ’16-bit Integer’ from the Variable Type dropdown list according to whether the MODBUS device outputs Float or Integer values.
- The entered details will generate a Data Load ID in the following format:
modbus://<host-name>:<port-number>/<starting register>/<data-type>/<slave id>
- For example, entering the following details will generate a Data Load ID of “modbus://team.co.uk:502/2/f/1”.
Configure TAC Continuum (Schneider Electric) Channels
Both the Periodic and Non Periodic Importers use the ExtendedLog table in the TAC MSSQL database to source data for channels. The Continuum Importers support multiple agents, the agent name needs to be included in the DataLoad Id to identify which database should be used. The system processes all channels where the Data Load ID 1 starts with "tac://". A Continuum Compliant dataload ID will look as follows:
| Pattern: | tac://<AGENT-NAME>/<SOURCE>/<HIGH-POINT-ID>:<LOW-POINT-ID> |
| Example: | tac://DEFAULT/i/1010834776:1090526341 |
The system then runs the following SQL to get the data for the channel:
SELECT PointIdHi, PointIdLo, DateTime, PointValue FROM ExtendedLog WHERE (PointIdHi = ?) AND (PointIdLo = ?) AND (DateTime > ? ) AND (DateTime <= ? ) ORDER BY DateTime |
For each data point that you wish to import data from, you will need to configure a Periodic HFD or Non Periodic HFD Channel (depending on which importer you use) within Sigma with the corresponding Data Load ID. To do this:
- In the relevant Channel Editor, enter the Data Load ID value in the Data Load ID 1 field, for example:
Configure Landis and Gyr Channels
Related content
@ Copyright TEAM - Energy Auditing Agency Limited Registered Number 1916768 Website: www.teamenergy.com Telephone: +44 (0)1908 690018