Sigma Online User Manual
Entering Consumption Data Values manually
Consumption Data is generally used for Scope 3 reporting. It is added into the Consumption Data Channel and then used in Energy Intelligence for reporting on.
If you want to add them in bulk, move to the Entering Consumption Data Values in bulk page.
This page shows how to enter Consumption Data Values manually:
Data Input activity
You can either open the Data Input Activity from the Consumption Data Channel or open it directly.
Opening the Data Input Activity (from the Consumption Data Channel)
This method allows you to add readings to single or multiple Channels, depending on whether you access it from the Consumption Data Channel or open the Activity directly.
From the Data Selector in an Activity, highlight the Consumption Data Channel or the Site (or if you have Consumption Data Channels at Site Group level - highlight the Site Group)
- Right click on the Consumption Data Channel, Site or Site Group
- Click Data Input
The Data Input Activity will open and show the Consumption Data Channel you highlighted:
If you want to add more Consumption Data Channels to the list, you will need to see the Data Selector.
- Double click on the ellipse (dots) on the left hand side to show the Data Selector
- Chose your preferred search type in the Data Selector
- Highlight the Consumption Data Channels that you want to add values for
Alternatively, open the Data Input Activity separately and choose the Consumption Data Channel(s) you want to add values to
Opening the Data Input Activity
- Click on the Data Input Activity
The Data Selector will default to Item Finder and Site.
- Using the Data Selector, select the Consumption Data Channel(s) using whichever search method you prefer
- Choosing a Site Group or Site will display and Consumption Data Channels that are directly underneath them
Entering Values
Once you have the Consumption Data Channel(s) in the main part of the screen, you will be able to see the Commodity, Unit, Emission Type etc. You can also see the previous Value and previous date.
Consumption or Emission Value?
Note: To check whether you need to enter Consumption values or Emission values, look at the Emission Type column:
- Emission column shows N/A - Channel is set to Consumption
- Emission column shows CO2 - Channel is set to Emissions
In this example, the Channel has also has Emissions in the name:
Adding new Values
- Double click into the line you want to add a value for
- Change the from date (only required if there is a gap in the consumption values)
- Change the to date (if required)
- Enter the new Value
- Click return
- If the Value passes validation, a green tick will be displayed:
- If the reading fails, a red cross or exclamation mark will be displayed, depending on the severity of the error
See below for how to deal with the failure.
Reviewing the Validation Results
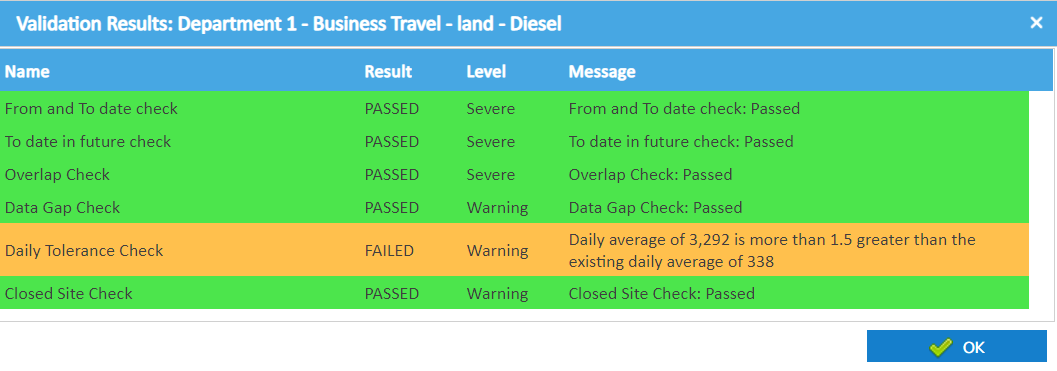
If the Value fails Validation, you can view the reasons why it has failed.
- Right click on the line
- Click View Validation Results
This will show what the value has passed and failed on:
- Click OK to return to the Data Input Activity
- Double click into the line to amend the value if required, or go to one of the Editing Options below
Right Click Options
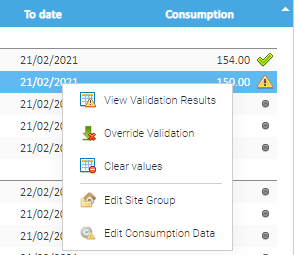
- Right click on a row to see the options available
- The options are as follows:
| Option | Description |
|---|---|
| View Validation Results | Shows what the value has failed on |
| Override Validation | Allows you to continue with a value, even if it has failed validation. You will see the following prompt if this option is chosen: Click OK to confirm you want to enter the Value |
| Clear Values | Removes the values entered in the To Date and Consumption fields |
| Edit Site Group | Takes you to the Site Group screen (This option will change depending on what level the Consumption Data has been set up on) |
| Edit Consumption Data | Takes you to the Data Consumption Channel |
Saving the Values
All Values need to pass Validation, before you can save them.
If you have a number of correct Values, but still have an incorrect one, it would be best to choose Clear value and come back to that Channel at a later date.
Once all Values show as passed:
- Click to save the Values
Note, you do not have to enter a reading for every line displayed. If you do not have a reading, it can be left blank.
Selecting/Deselecting Columns
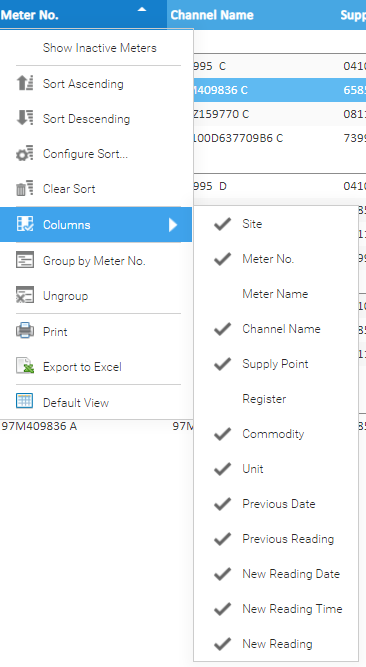
The visible columns can be managed from the Column Selection.
- Click on the downward arrow on the Column Header, then highlight Columns to see the full list
Entering Values directly into the Consumption Channel
Note: there is no validation when entering Values directly into a Channel. It is recommended to use the Data Input Activity to validate the readings entered.
- Open an Activity such as Estate Management
- Using the Data Selector of your choice, highlight the Consumption Data Channel
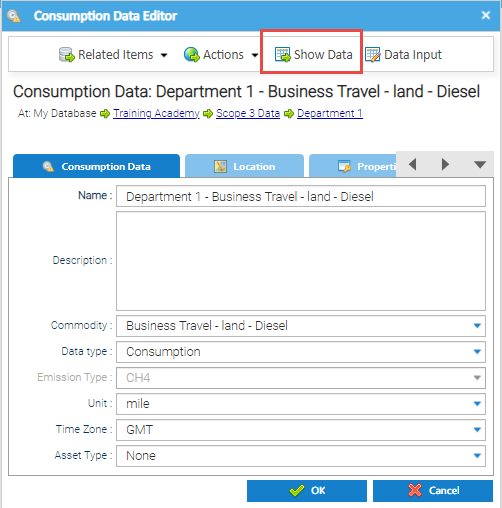
- Click Show Data
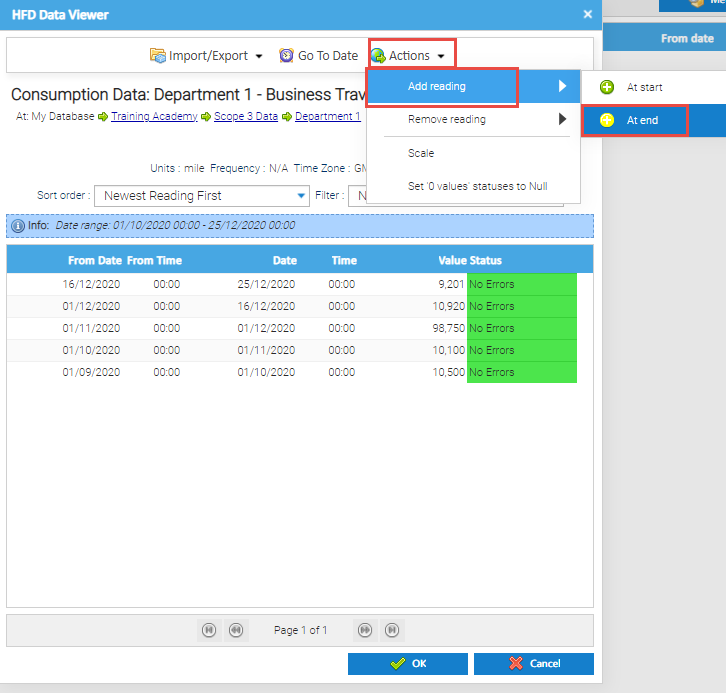
The HFD Data Viewer Editor appears:
- Click Actions > Add reading > At end
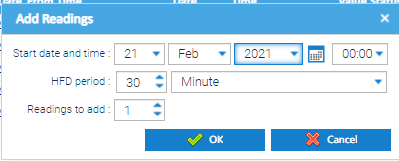
- Amend the Date to the date of the Value you are adding
- Click OK
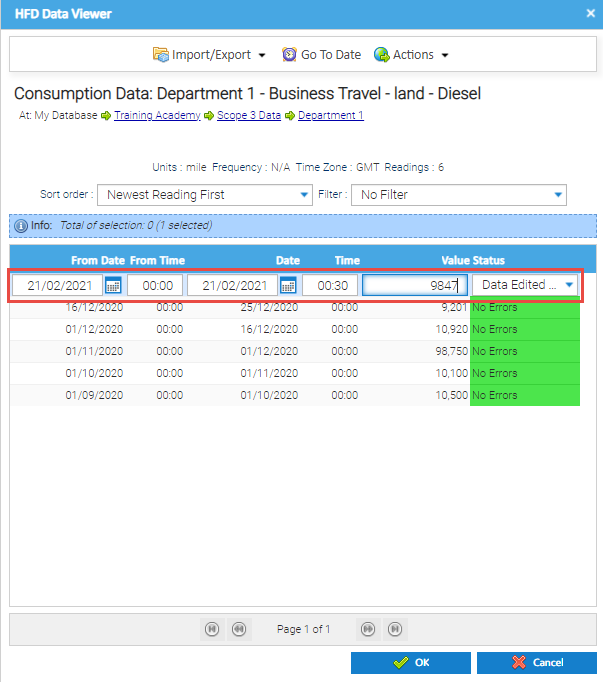
The HFD Data Viewer will display a line at the top with the date you selected. The Value will be 0 and the Status will be Data Edited Manually.
- Double click into the newly created line
- Amend the date (if required)
- Enter the value in the Value field
- Click OK to save and close the HFD Data Viewer
- Click OK to close the Consumption Data Editor
Note: It is recommended to use the Data Input Activity so that Sigma can validate each Value entered
Related content
@ Copyright TEAM - Energy Auditing Agency Limited Registered Number 1916768 Website: www.teamenergy.com Telephone: +44 (0)1908 690018


