Bill Messages are errors that occur during the creating of the bill.
...
Some are for information, some will require actioning.
Message Severity
There are four levels of severity:
Off - no message will be created
- Turn off if you do not want to see messages such as Cancelled Bill
Info - a Tenant Bill will be created
- Examples:
- Bill cancelled
- Channel data gap was found for Channel
Warning - a Tenant Bill will be created
- Examples:
- No channels found under supply point meters
- Serious error occurred during validation of bill
Error - a Tenant Bill will NOT be created
- Examples:
No meters found under supply point
No tariffs could be found for account
Information on the types of Bill Messages and descriptions is available here.
Opening the Tenant Bill Run Management Activity
- Click on Tenant Bill Run Management Activity to view the Bill Messages
...
- Click on the Bill Run line to see the messages in the Bill Messages Section
- Highlight the line to see the messages

Bill Messages Section

The table will show:
- Tenant Account Number
- Tenant Name
- Supply Point
- Level - Info, Warning or Error (for more information on the setting the level, click here)
- Message Type - see here for more details on the types
- Message - see here for more details on the descriptions
Right Click Option
- Right click on a Message to Edit / View the Tenant Account
...
The Tenant Account Editor popup appears

Reviewing the Messages
Warning Bill Messages will cause a bill not be to created, so will need to be dealt with from the Tenant Bill Run Initiation Activity. Others can be dealt with from the Tenant Bill Initiation Activity or the Tenant Approve and Issue Bills Activity (see below for more details)
Info Message Example
 T
T
Note: This is an Info Message and it is not mandatory to fill any gaps. However, if you want to charge your Tenant for a full period, you may want to fill any gaps.
...
The Events Activity shows

Data Selector
- Click on the Site
Filter
- Level - choose Warning
- Selection type - choose Selected Items
...
- Click
 to return to the original graph
Filling the Gap
There are 6 options
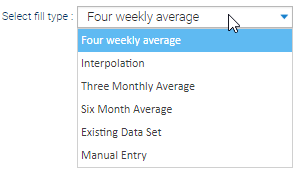
Four weekly average
Looks at the period of data over the previous four weeks and gives you an average provide to fill the gap
Note: if the gap is more than four weeks, this method will only fill the first four weeks. It would be advisable to import the actual data into Sigma, rather than filling the gap
Interpolation
A very basic gap filling tool. It looks at the last half hour period before the gap and the first half hour period straight after the gap and fills it with an average of those two figures
Three Month Average
Looks at the period of data over the previous three months and gives you an average provide to fill the gap
Note: if the gap is more than three months, this method will only fill the first four weeks. It would be advisable to import the actual data into Sigma, rather than filling the gap
Six Month Average
Looks at the period of data over the previous six months and gives you an average provide to fill the gap
Note: if the gap is more than six months, this method will only fill the first four weeks. It would be advisable to import the actual data into Sigma, rather than filling the gap
Existing Data Set
Choose from the dropdown of existing Periodic Channels associated with the Site
Manual Entry
Allows you to add a figure for the consumption period
...
The Events Activity will refresh and the Event will be removed from the screen automatically
Warning Message Example

If this error occurs, the bill would still be created, but the system would be unable to validate it
Error Message Example
An example would be Error BM0006 - No meters found under supply point:
...
An Error messages prevent a bill from being created so this will need to be addressed. In this instance, Sigma cannot find a meter under the Supply Point.
Finding the Supply Point
To deal with this error you will need to view the Supply Point.
...
Note: There are no meters showing the in the meter section - therefore the Bill Message appeared
Adding the Meter
- Drag and drop the relevant Meter from the Available Meters section to the Selected Meters section
...
Note: If no meters are in the Available Meters section, you will need to add a Meter and a Channel. Click here for more details on how to add these.
Re-Running the Tenant Bills Run
Once you have corrected any errors, ie added a meter, filled a gap etc, you will need to Re-run the Billing Run.
...