Introduction
There are various ways to enter manual meter readings into Sigma. They can be entered directly into the Channel, through the Data Input Activity.
It is recommended to use the Data Input activity as there is no validation when entering the reading directly into the Channel.
The meter readings are entered in a non-periodic Channel that sits underneath the Meter. These readings can be used to help validate bills and used in reporting consumption on Meters.
Opening the Data Input activity
This method allows you to add readings to multiple Channels and gives you confidence in the quality of the readings that you adding as there is validation that checks each reading.
Opening the Data Input Activity from the Estate Management Activity
If you are in the Estate Management Activity, you can move to the Data Input Activity and retain the Meter details.
- Click on the Meters & Channels Tab
- Highlight the Meter
- Click New Meter Reading

This will open the Data Input Activity and show the Meter you highlighted.
Opening the Data Input Activity
- Click on the Data Input Activity

The Data Selector will default to Item Finder and Site.
When you choose Sites, the right of the Activity will show any Sites that have Meters with Non-Periodic Channels.

You can select Sites, Meters or Channels using whichever search method you prefer.
If you want to add more meters, you will need to see the Data Selector.
- Click on the ellipse (dots) on the left hand side to show the Data Selector

- Click on the red Cross to remove the Search
- Use the Data Selector as normal

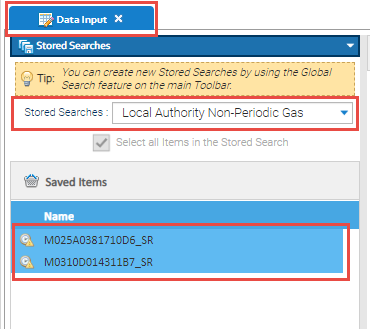
Searching using a Stored Search
A Stored Search can be created and used in the Data Input Activity. However, it is used in a slightly different way to most Activities:
- Open Data Input Activity
- Change the Data Selector to Stored Searches
- Select your Stored Search
- Highlight the Items in the Stored Search
- Change the Data Selector to Custom Selection
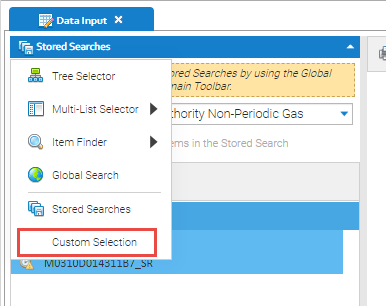
- Drag and drop the Items from the Saved Items to Search Steps and the Activity will update and you can now enter your meter readings

Entering meter readings
- Double click into the line
- Change the reading date (if required)
- Change the reading time (if required)
- Enter the new reading
- Click return
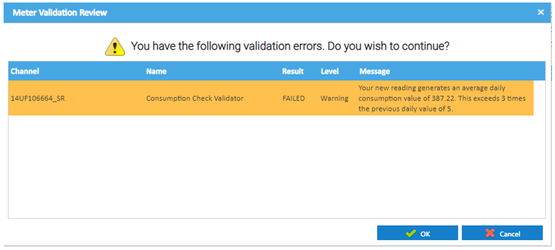
- If the reading passes validation, a green tick will be displayed


If the reading fails validation, an exclamation mark will be displayed

Viewing the Validation Results
- Right click on the line > View Validation Results

This will show what the reading has passed and failed on
- Click OK

Editing Options
- Right click on a row to see the options available
- View Validation Results- shows what the reading has failed on
- Clear Values - removes the values entered in the New Reading Date and New Reading fields
- Edit Site – takes you to the Site Editor screen
- Edit Meter – takes you to the Meter Editor screen
- Edit Channel – takes you to the Non Periodic Channel Editor screen where you can click Show data to see all of the readings entered for that Channel
Selecting/Deselecting Columns
The visible columns can be managed from the Column Selection.
- Click on the downward arrow on the Column Header, then highlight Columns to see the full list
l 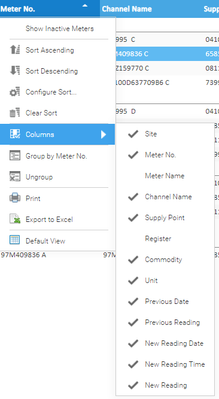
Saving the Readings
- When you have entered all the readings, click

Viewing Validation errors
All validator errors will show
- Click OK to save all the entered readings
- Or Cancel to go back to amend readings.
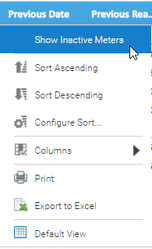
Showing Inactive Meters
Inactive meters can be added to the table.
- Right click on the table headers to allow inactive meters to be displayed
Entering meter readings directly into the Channel
There will need to be a Non-periodic Channel set up underneath a Meter for you to be able to enter meter readings.
Note: there is no validation when entering meter readings directly into a Channel. It is recommended to use either the Data Input Activity to validate the readings entered.
Entering a reading in the Non-Periodic Channel
- Open the Estate Management Activity
- Search for the Site or Meter/Channel and go to the Meters & Channels Tab
- Highlight the Meter and Non-Periodic Channel
- Click
 HFD Viewer

- Click Actions > Add reading > At end
- Click OK

- Enter the date of the reading
- Click OK

- Double click into the newly created line
- Amend the date (if required)
- Amend the time (if required)
- Enter the meter reading in the Value field
- Click OK
- Click OK to close the popup to save the reading
