...
...
...
...
...
...
...
...
...
...
...
...
...
...
...
...
...
...
...
...
...
...
...
...
...
...
...
...
...
...
...
...
...
...
...
...
...
...
...
...
...
...
...
...
...
...
...
...
...
...
...
...
...
...
...
...
...
...
...
...
...
...
...
...
...
...
...
...
...
...
...
...
...
...
...
...
...
...
...
...
...
...
...
...
...
...
...
...
...
...
...
...
...
...
...
...
...
...
...
...
...
...
...
...
...
...
...
...
...
...
...
...
...
...
...
...
...
...
...
...
...
...
...
...
...
...
...
...
...
...
...
...
...
...
...
...
This section shows how to create and manage Bill Validation.
| Table of Contents |
|---|
Introduction
Validators can be setup to determine the rules that should be applied when a new bill is loaded into the system to check for any potential errors or issues with that bill. The validators will run automatically and the outcome of the validation that has been performed will be visible.
The validation that is performed is entirely configurable and this is managed in the Validator Setup Activity and are used to validate manually entered and electronically loaded (EDI or CSV) Bills. There are various ways to set these up, and this Guide will help you decide what is best for your portfolio.
In this section:
| Table of Contents |
|---|
...
Opening the Validator Setup Activity
- Click on Validator Setup Activity
Viewing existing Validators
Any existing Validators will show in the top right of the screen
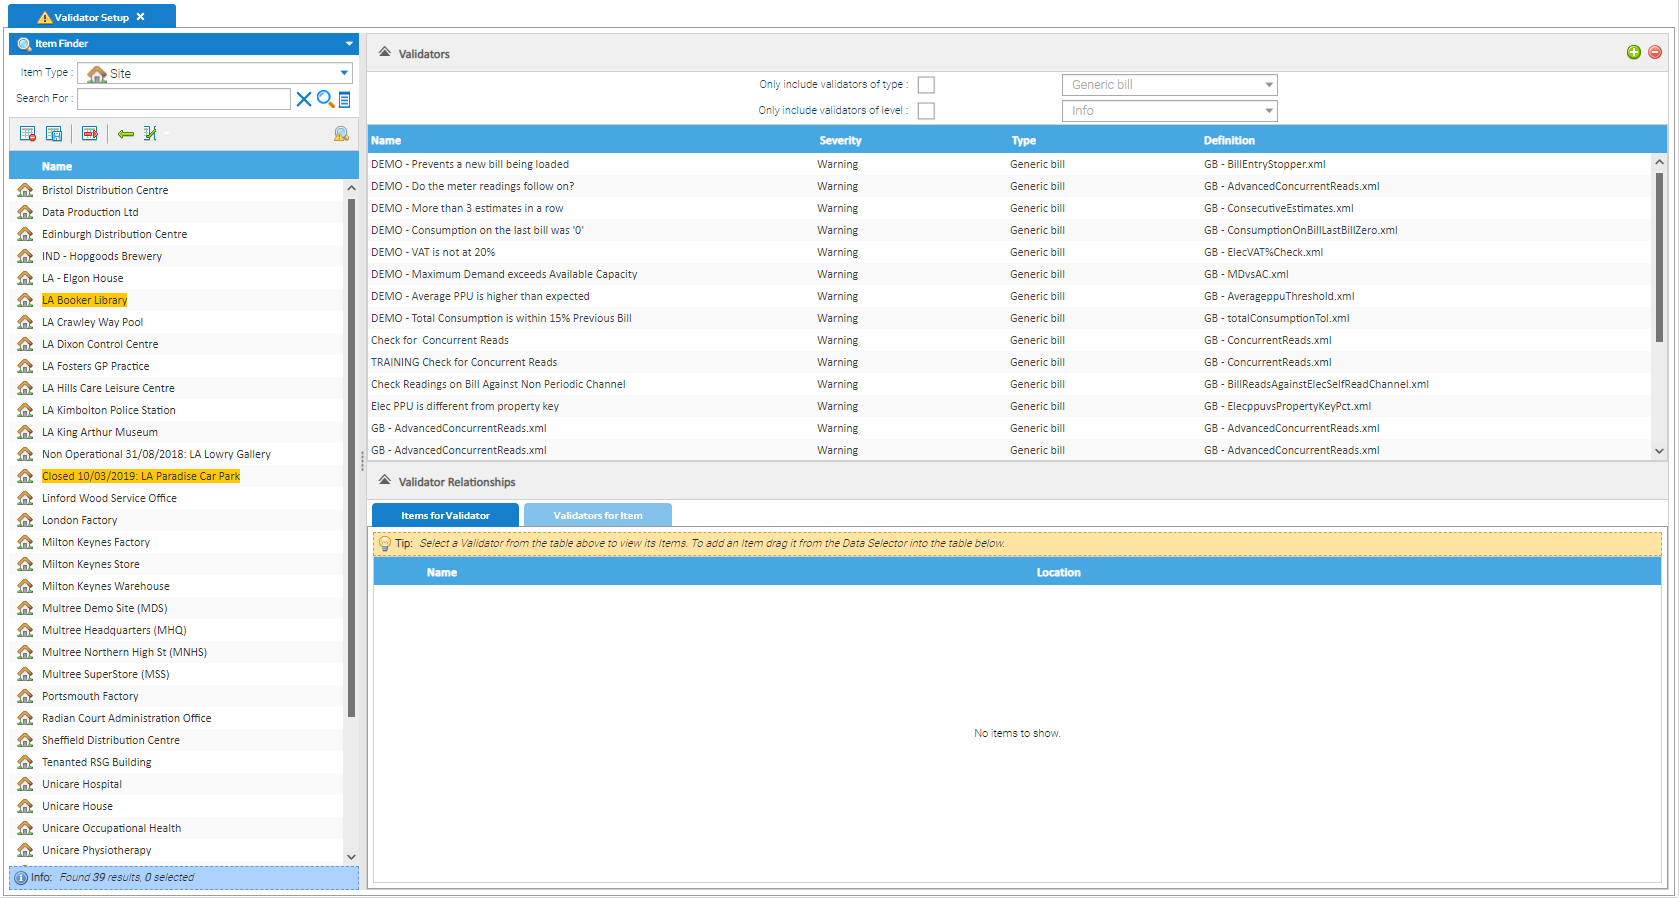
Understanding the Validator
Each validator will show:
- Name – defined by the user
- Severity – Info, Warning or Severe
- Type – Generic Bill (all bills no matter the entry method), Bill Entry (just for manual bills) or Tenant bill (used for Tenant Billing validation only - this is a separate module of the system)
- Definition – the definition of the validator (this is system defined and represents the validator that has been setup)
Understanding the
...
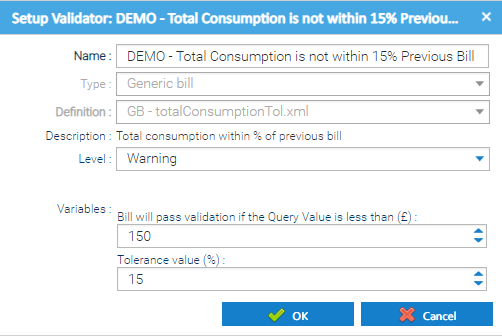
Variables
Each validator may have variables to control how it looks for potential problems. this may be threshold boundaries to control how sensitive the check should be.
- Right click on a Validator > Setup Validator

In this specific example, it shows the "GB - totalConsumptionTol.xml" validator which is checking the consumption on the bill being validated is within a tolerance of the previous bill that exists for the same Account.
This shows how the validator The Validator is configured with the following:
- Name – defined by the user
- Type - Generic Bill or Bill Entry (just for manual bills)
- Definition – the definition of the validator
- Description – a description of the validator
- Level - Info, Warning or Severe
Variables
Bill will pass validation if the Query is less than (£)
- The bill will fail the validation if the cost of the difference is more than the given figure (£150)
- Tolerance value (%)
- The bill will fail validation if the tolerance is more than or less than the given figure (15%)
Each Validator will have different variables and more information can be found here for the different validators available.
Any issues setting up a Validator should go to our Support Team support@teamenergy.com
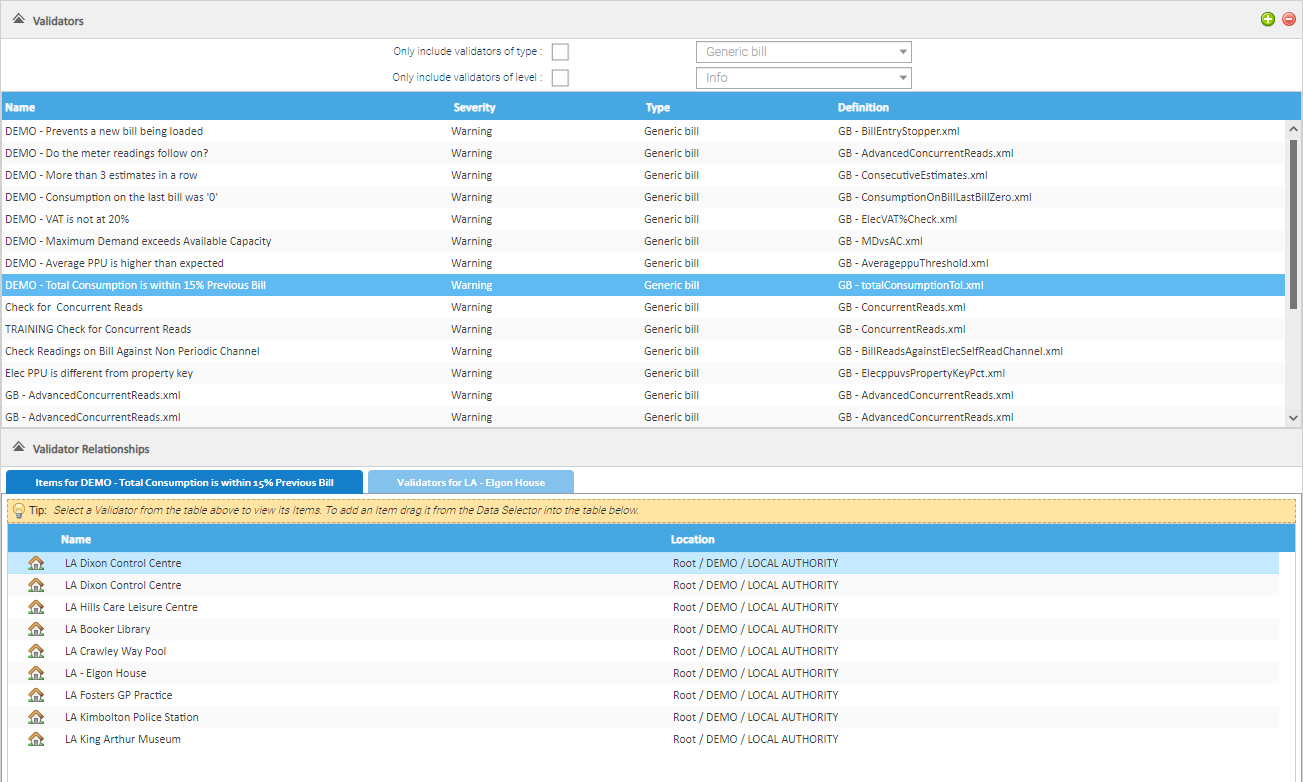
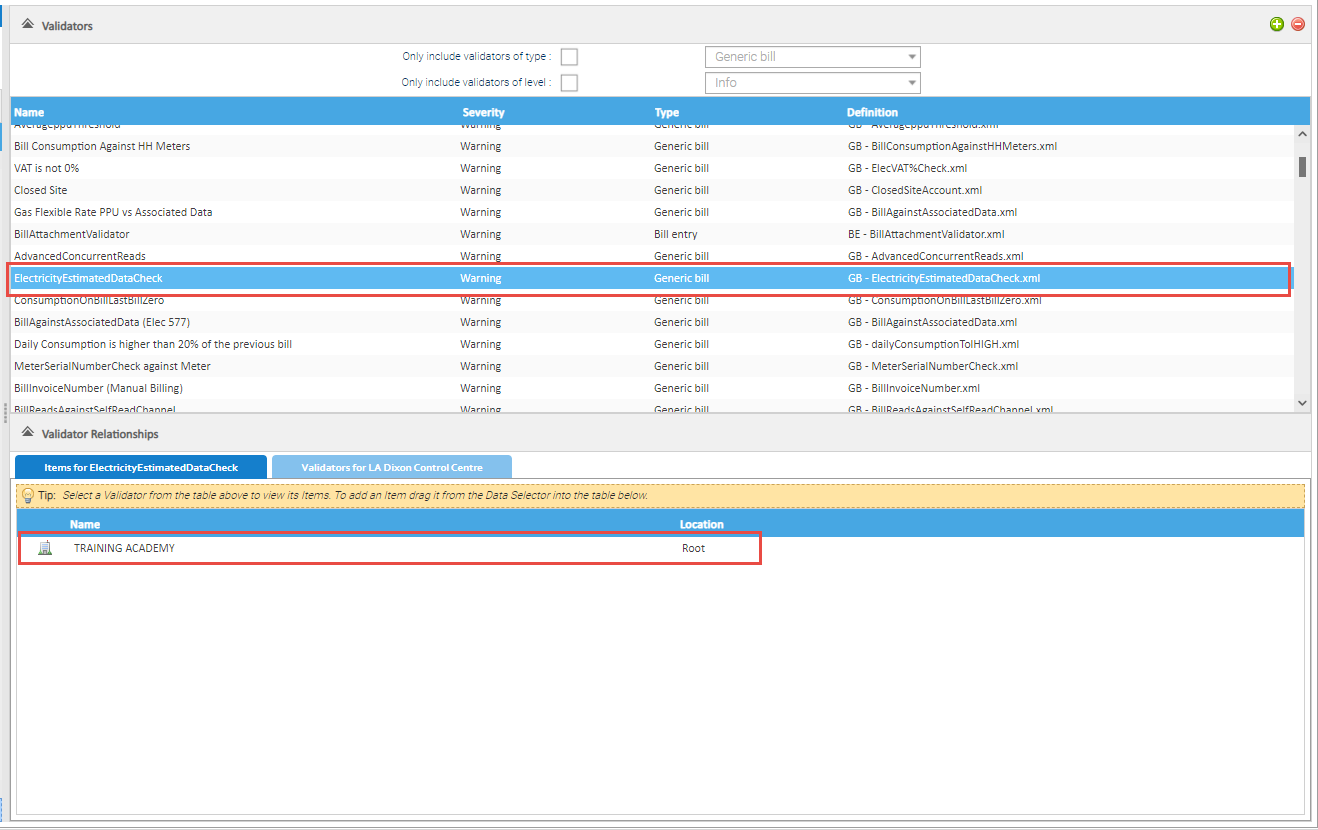
Viewing Validator Relationships
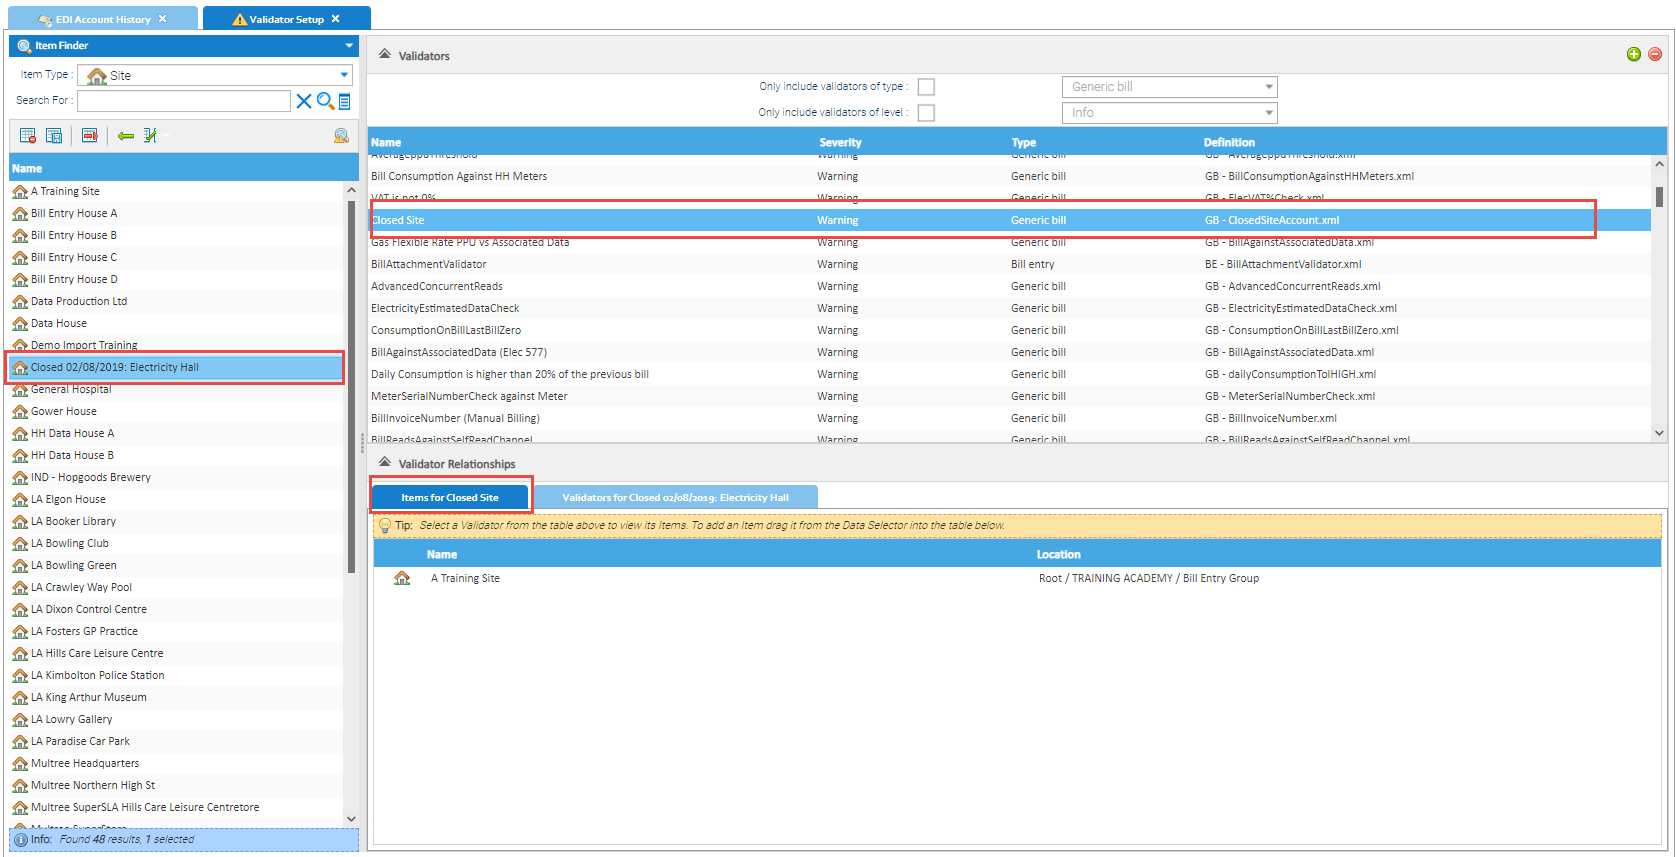
Items associated with the Validator
Each validator Validator is set up uniquely and can be attached to an Account, Site, Site Group or the whole Organisation.
It is possible to see what items You can view what Items (Site, Account etc) have been associated with a a particular validator that has been setup in the Valdiators list. This is accessed in the first tab (Items for <validator name>) of the Validator Relationships section.Where the validator is assigned in the hierarchy Validator.
Where the Validator is assigned in the hierarchy of the energy estate will determine for which Accounts the validator Validator will run for. For example, if the validators Validators is assigned to the Site, it will run for all Accounts that exist beneath that Site or selecting Site Group, it will run for all Accounts that exist beneath that Site Group (which might be across multiple Sites). Alternatively, assigning the Validator to an Account means it will only run for bills entered against that particular Account.
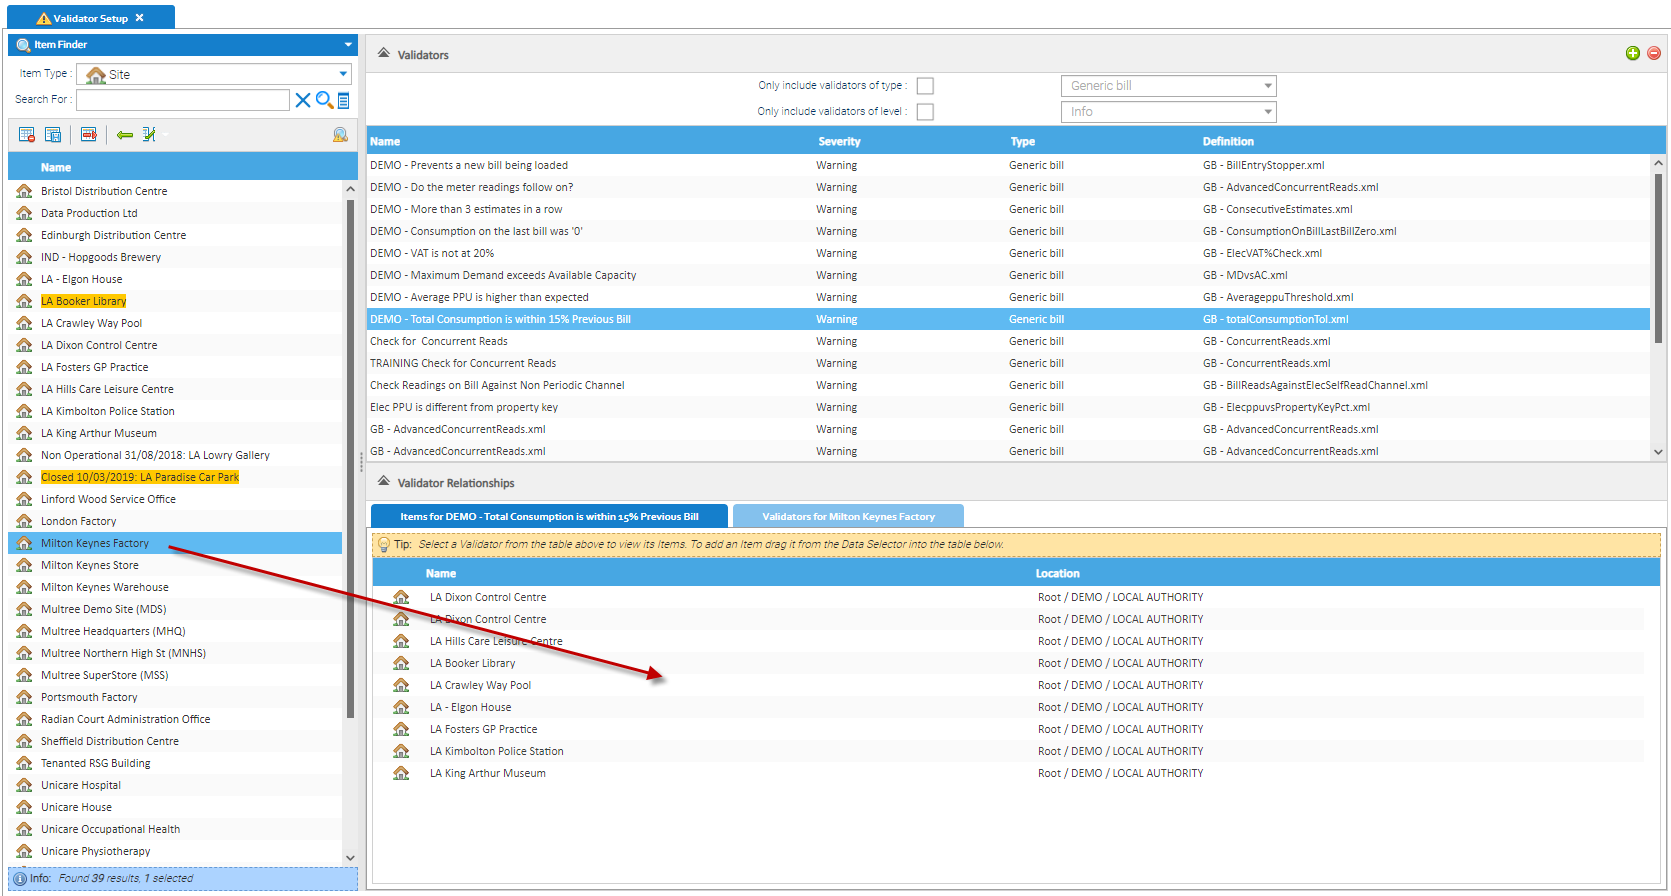
- Click on a Validator and the Validator Relationships section of the screen will Items for tab will display a list of the items Items that the validator will run for.on
Anchor ItemValidators ItemValidators
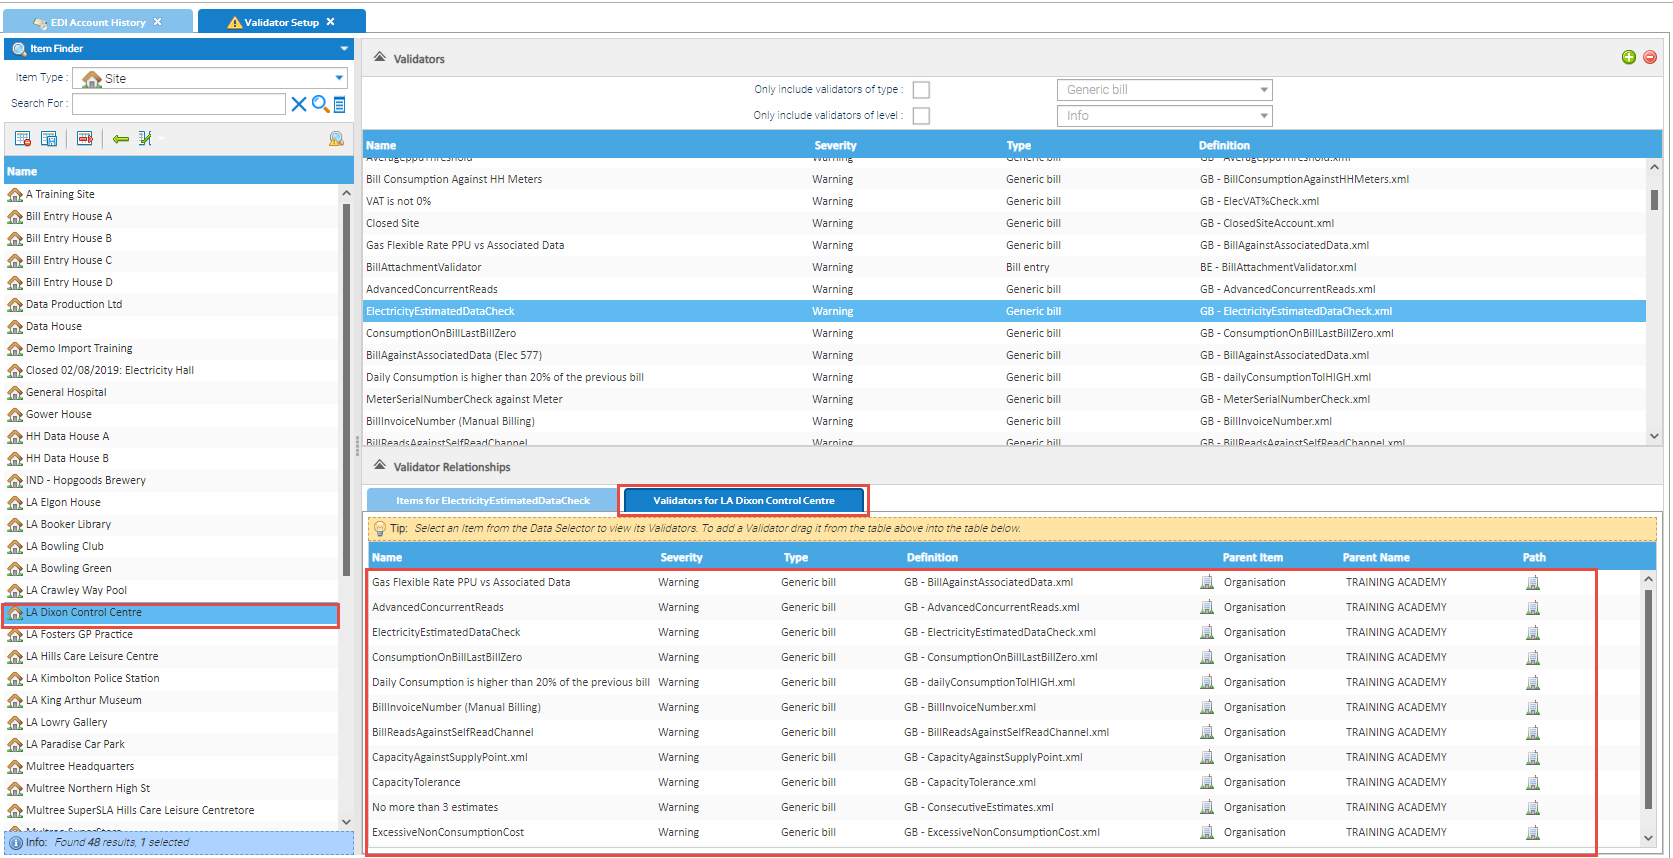
Validators associated with an item
| ItemValidators | |
| ItemValidators |
It is also possible to see what validators will You can view what Validators run for a particular item that is is selected in the item Finder on the left hand side of the screen. This is accessed in the second tab (Validators for <item name>) of the Validator Relationships section.Item.
This is useful to see what validators will actually run for a specific Billing Account, no matter where the validator has been assigned in the estate hierarchy.
It will show all the validators, and at what level they have been setup, along with the navigation path to those items.
...
Adding a new Validator
Each Validator is set up uniquely and can be attached to an Account, Site, Site Group or the whole Organisation.
- Click on

- Definition: Choose the Definition first
- Name - Type the Name you want to see
- Type – Choose the Type
- Description - will be pre-filled based on the definition selected
- Level – Choose Info, Warning or Severe depending on how important you deem any issues found by the validator would be.
- Variables – Configure any variables applicable to the Validator as per your needs
| Info |
|---|
Use the Billing Validators guide to assist you in choosing the correct one(s) for your portfolio. |
- Click OK

Adding Items to the Validator
Once you have enabled the configured the Validator, you will need to add the Items you want to associate with it.
- Click on the Validator
- Drag and Drop the Item(s) from the Data Selector into the Validator Relationships section Items section at the bottom of the screen
| Tip |
|---|
The items that are being linked to the validator can be changed be choosing the appropriate Item Type from the Item Finder on the left hand side (i.e. Organisations, Site Group, Site, Account). |
Amending a Validator
- Right click on the Validator
- Click Setup Validator
- Amend the details
- Click OK

Deleting a Validator
If you no longer need a Validator, it can be deleted.
- Right click on the Validator
- Click Remove Validator
- Click Yes
This will remove the Validator from the list but will not affect any previous validation..