Managing the Batch
Open EDI Batch Management Activity
Accepting the Batch
Note: If you chose to automatically accept the Batch and it has passed the Passed Bill Threshold, this will automatically have been done
Click ![]() to Accept the Batch
to Accept the Batch

Click Accept
Click Yes
X out of the screen
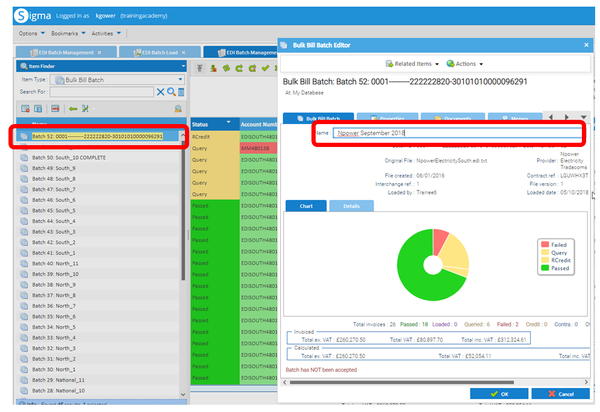
Header Details
The header gives details regarding the Batch:
| Field | Description |
|---|---|
| Batch ID | A unique ID |
| Original File | Name of the file |
| File created | Date file was created |
| Interchange ref | Defaults to 1 |
| Loaded by | Shows who loaded the File |
| Batch number | The Batch number created for this file |
| Provider | The Provider chosen when loaded the file |
| Contract ref | A reference in the EDI file |
| File version | Defaults to 1 |
| Loaded date | The date the file was loaded |
| Save to Document Library | Yes/No (dependent on the choice made when in the Batch Load Activity) |
| Automatically Accept | Yes/No (dependent on the choice made when in the Batch Load Activity) |
| Passed Bill Threshold | The % figured added when in the Batch Load Activity |
| Load Passed Bills to Account | Yes/No (dependent on the choice made when in the Batch Load Activity) |
| Notifications Enabled | Will show Error, Completion or both (dependent on the choice made in the Batch Load Activity) |
| Batch has been accepted | Shows either Batch has been accepted or Batch has NOT been accepted |

Working through the Queries and the Failed Bills
Use the Filter option if required.
Export to Excel if required.

Right click on the Bill > View Status Notes to see what the bill has failed on
Use Bill Entry to investigate Sigma on previous consumption, costs, etc.
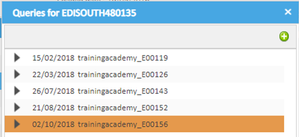
Viewing any existing queries on the Account
Add the Account Queried Column to the screen (see Item 1)
If it is ticked and in red, then there is a query on the Account 
Right click on the Bill > Edit Queries > Edit Account Queries.
Queries in orange are open, Queries in white are closed.
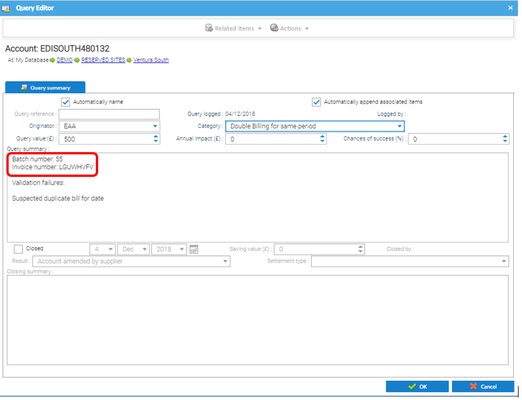
Appending a Query
Right click on the Bill > Edit Queries > Edit Account Queries
Right click on the Query > Append Query
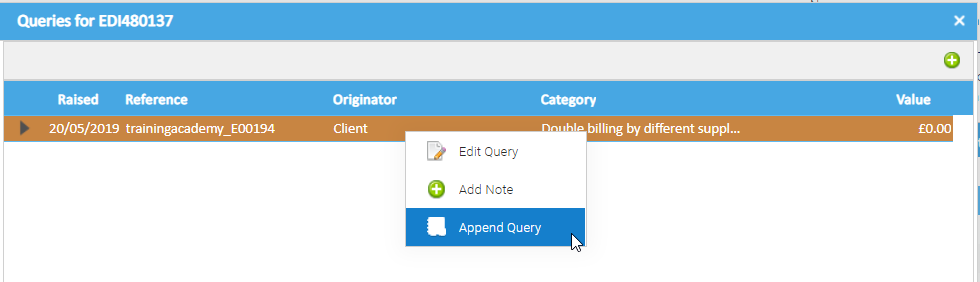
This will open the Query Editor and show the appended date and User appending the Query
Append the Query, then click OK to close.
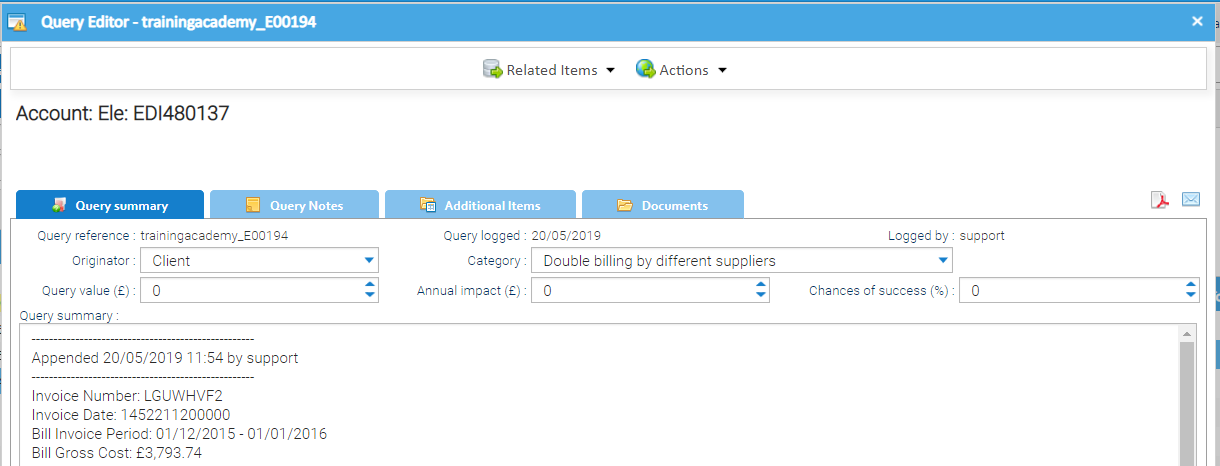
Generating a Query
Right click on the Bill > Generate Queries > Generate Account Queries
Tick to append the details of the failed valuation
Choose the Originator
Choose the Category
Add the Query value (following the guidelines).
Add your own information to the Query Summary (following the guidelines). The Batch number and the Invoice number will show in the
Click OK
Right click on the Bill > Toggle Status
Changing from Query or Credit to Passed (no action required)
Right click on the Bill > Toggle Status
Changing from Failed to Passed (no amendment to the bill required)
Generate a query if required, then:
Right click on the Bill > Toggle Status
The Validation Results Popup appears to show what validation the Bill has failed on:
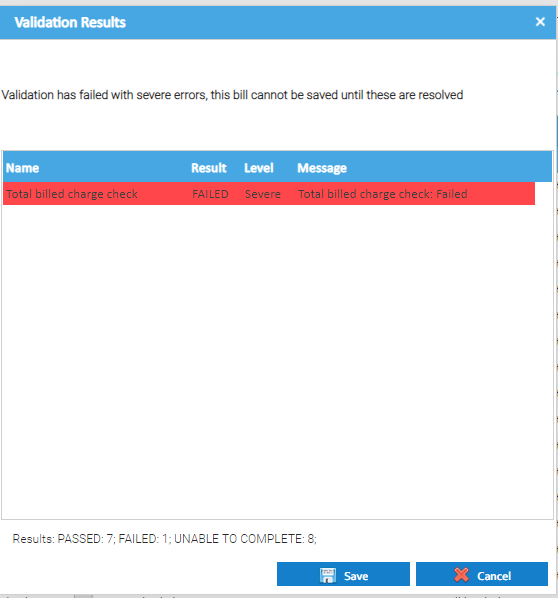
Click Save to show the Choose Option pop up. You can either choose Query or Override
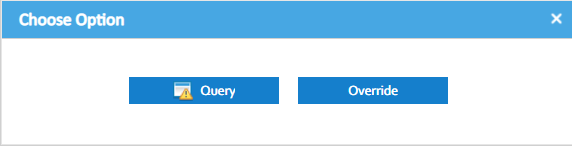
Overriding Validation
Click Override
Choose the User
Enter the Password
Enter the reason for the override
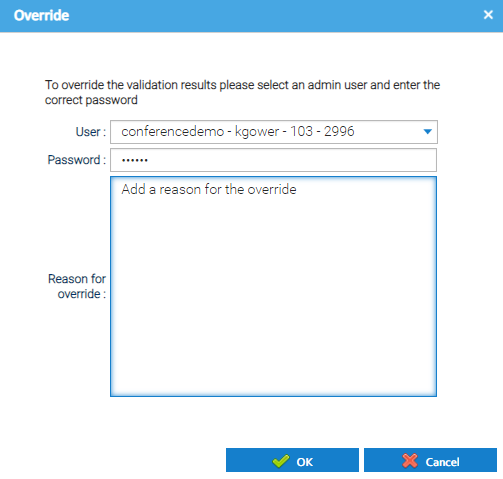
Click OK to close and the bill will change to show as Passed

Querying a Validator
Click Query
Select the Validator(s) you want to add the Query for
Click OK
Complete the Query Editor
Click OK
The Bill will now show as Passed (no override is required as you have created a Query for the Bill)
Changing from Failed to Passed (amendment to the bill required)
Right click on the Bill > Copy failed bill to Account
Generate a query if required.
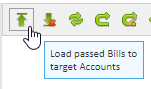
Loading the Passed Bills to the Accounts
Note: if you have chosen to automatically load Passed Bills to Account, some bills will already show 
Once you have been through the Batch and passed any queries and failures, you then need to load the bills onto the Accounts, so that they are visible in Bill Entry.
Click Load passed Bills to target Accounts
All  will change to
Renaming the Batch
Right click on the Batch name > Edit
Rename the Batch in line with the previous batches
Click OK
Top Tool Bar Options

| A | Loads all passed bills to the Accounts |
| B | Unloads all bills cancelled by bills in this batch |
| C | Checks the account numbers again (if you had to make any changes) |
| D | Re-evaluates the current batch, running the validation again |
| E | Re-evaluates the Supplier Validators |
| F | Toggles the status of all Credit Invoices |
| G | Toggles the status of all bills in the grid |
| H | Accepts the batch statistics |
| I | Changes your preferences |
| J | Prints the batch details |
| K | Concatenates all PDF bills into one PDF file |
| L | Sends the batch details to Excel |
| M | Filter the table of data |
Bill Status
| Status | Description |
|---|---|
| Passed | A bill in the batch file that has passed the EDI validation |
| Query | A bill that has failed a validation with the warning level of ‘Query’.This bill can be toggled to ‘Passed’ by the user or a query generated on the Account |
| Failed | A bill in the batch file is fundamentally incorrect, e.g. gross total, net total and VAT do not tally perhaps due to a typographical error.The only option to load this invoice is to copy failed bill to account |
| Loaded | A bill has been loaded successfully into the Sigma database |
| Credit | The bill in the batch file is a credit note for a specified account.This bill can be toggled to ‘Passed’ by the user if happy with the invoice |
| QCredit/RCredit | A queried/rejected credit invoice. This bill can be toggled to ‘Passed by the user or a query generated on the Account |
| FCredit | A failed credit note invoice. The only option to load this invoice is to copy failed bill to Account |
| Contra | A contradict status bill in the batch file is a direct inverse of a current bill. It is applied only to VAT rated bills.The bill must be the exact dates, consumption and value (in negative). This bill can be toggled to ‘Passed’ by the user if happy with the invoice |
| QContra | A queried Contra bill.This bill can be toggled to ‘Passed by the user or a query generated on the Account |
| FContra | A failed Contra bill.The only option to load this invoice is to copy failed bill to Account |
| Cancel | See Contra above |
| QCancel | A queried Cancel bill |
| FCancel | A failed Cancel bill |
| Loaded (M) | A bill that has been manually entered. For example – when you use the ‘copy failed bill to account’ function |
| Unloaded | A status used instead of ‘Passed’ for when a supplier cancels the invoice without an associated credit or replacement |
| Replaced | An invoice that has been overwritten by a subsequent EDI bill. |
Right Click Options
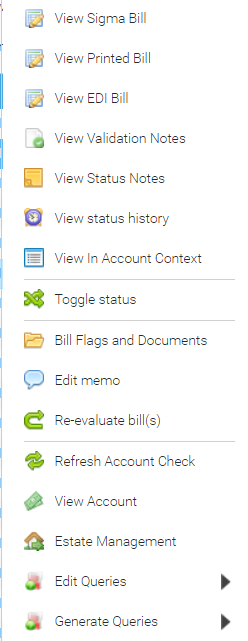 | View Sigma Bill will show you how the EDI data has loaded into the Sigma billing screen, much like Bill View or Bill Entry View Printed Bill will show the Bill Entry details in an invoice style View EDI Bill will show the data provided within the EDI file View Validation Notes will show all of the validators that processed against the bill and the resulting status View Status Notes will show any validations preventing the bill from loading View Status History will show how the status has changed, when and by whom View in Account Context will open a pop up so that you can see the bill in the context of all the existing bills. See below for more details Toggle Status will change the status of the bill to pass where possible Move EDI Bill to Account will load a bill to the Account and change the status to ‘Loaded’ Bill Flags and Documents will allow the user to attach a document to the bill as well as amend the (a) and (r) flags where required Edit Memo will allow you to view all existing memos and add a new one Re-evaluate bills(s) will allows you to re-valuate the bill(s) you have highlight (if you want to re-evaluate all the bills, use the Re-evaluate current batch option at the top of the screen Refresh Account Check will check to see if there is a matching account number in the database View Account opens up the Account Editor window Estate Management opens up on the Accounts tab of the Estate Management Activity, with the Account number highlighted. See below for more details Edit Queries allows the user to edit existing queries associated with the Account Generate Queries allows the user to create a query on the Account |
View in Account Context option
This option allows you to display a pop-up of all the bills for this account - including the bill in the EDI Batch Management. It will highlight the Bill in grey.
It allows you to see the full account history and can help to see any spurious behaviour in previous bills and may help explain the situation.
Right click on the Bill
Choose View in Account Context
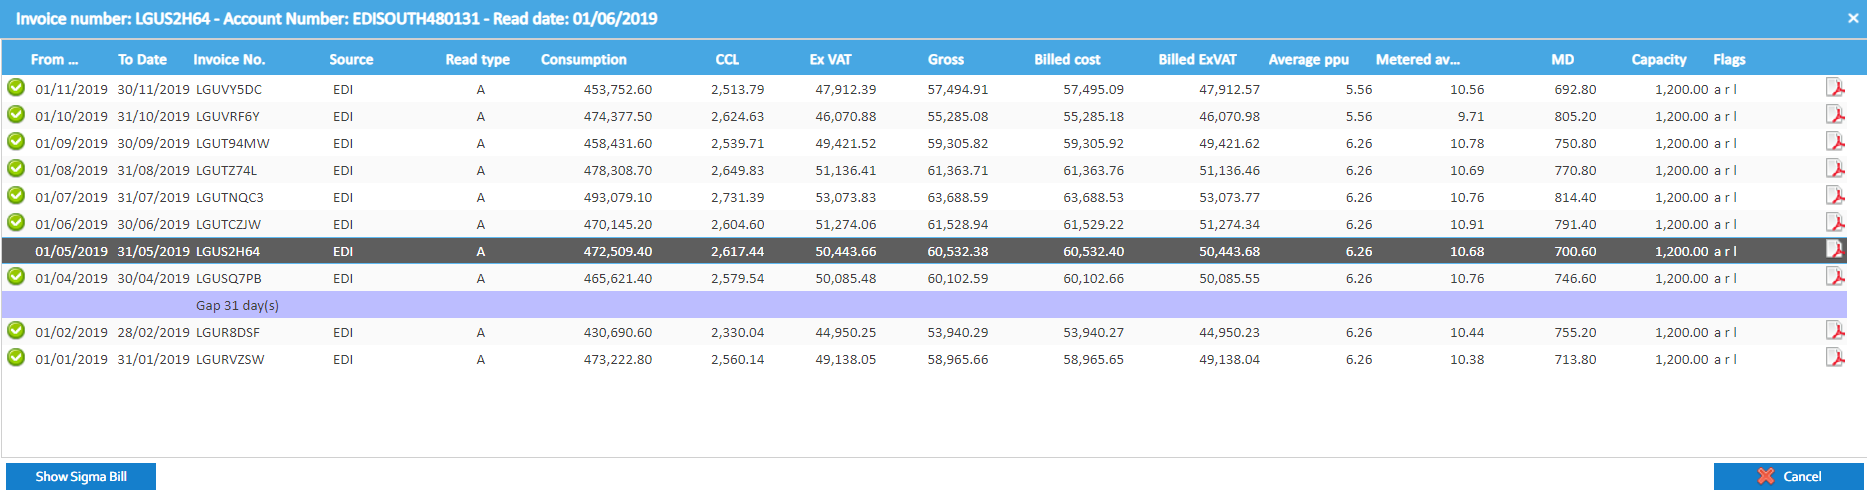
Click  to view the Bill in Sigma
Estate Management option
This option allows takes you to the Accounts Tab in the Estate Management Activity and highlights the Account you have click on.
From here you can click on other options to move to other Activities such as:
- Bill Entry Original
- Bill Entry
- EDI Account History
- Validation Management
- EDI Batch Management
- Reporting
- Analysis

Alternatively, click on one of the Tabs to view data at a Site Level:
- Site Summary
- Supply Point
- Acocunts
- Meter & Channels

Click here for more information on the Estate Management Activity
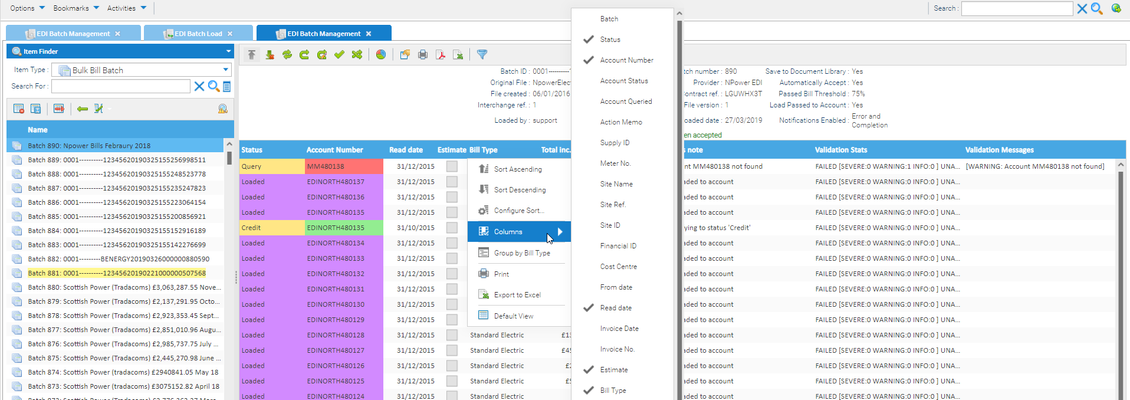
Adding/Deleting Columns
Highlight the Batch in the Item Finder
Click on the Column Header > Columns, then add/delete as required
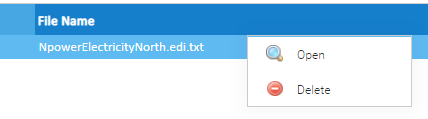
Viewing the EDI file in the Document Library Activity
Click on the Document Library Activity
Open the EDI Files Folder on the right hand side to see Year, Month and Date files to see any EDI Files that have been saved

Right Click and Open to download the File if required